Gearbox Teardown & Refurbish - 6HP28A61

5.0 V10 50v biturbo - 571 bhp
ATinOf
3rd Gear
Posts: 444
Joined: Fri Jul 06, 2018 7:32 pm
Location: Cheshire

Re: Gearbox Teardown & Refurbish - 6HP28A61

Post by ATinOf » Mon Sep 03, 2018 12:31 pm

Dont be tempted to move the gear select lever unless you have to, like me you may find the roller tensioner flies out (particularly if you are moving it beyond a natural position!), it took me a good ten minutes crawling on the floor to find the bloody thing afterwards!!
Image

Image
Last edited by ATinOf on Mon Sep 03, 2018 9:26 pm, edited 2 times in total.

ATinOf
3rd Gear
Posts: 444
Joined: Fri Jul 06, 2018 7:32 pm
Location: Cheshire

Re: Gearbox Teardown & Refurbish - 6HP28A61

Post by ATinOf » Mon Sep 03, 2018 12:32 pm

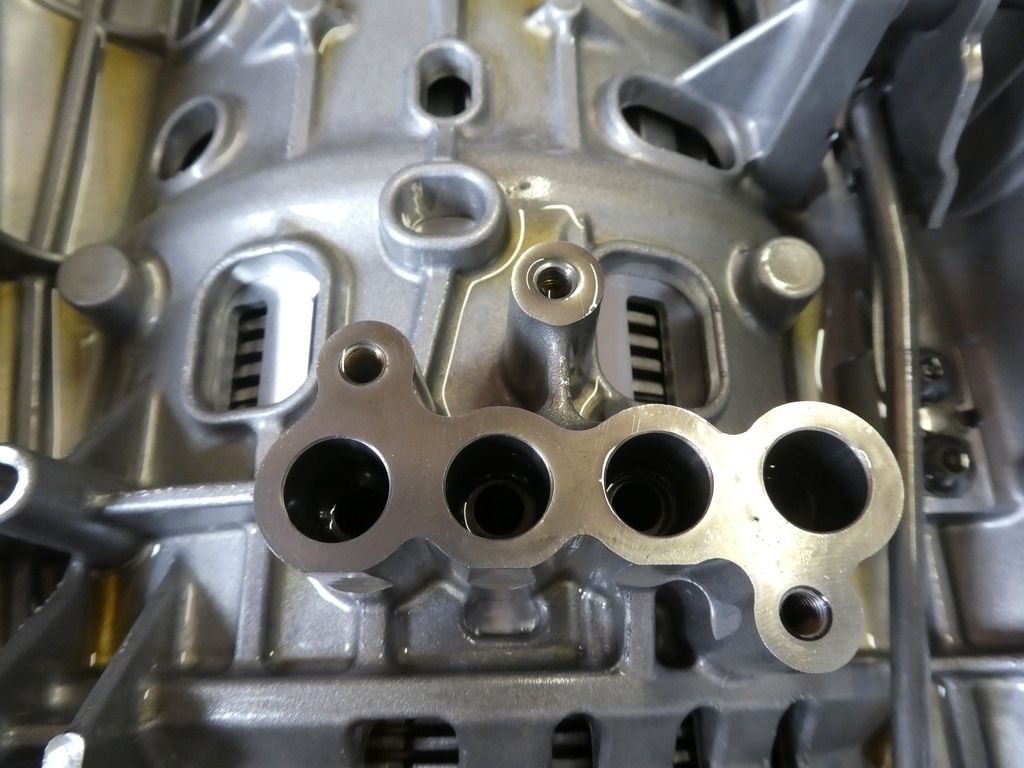
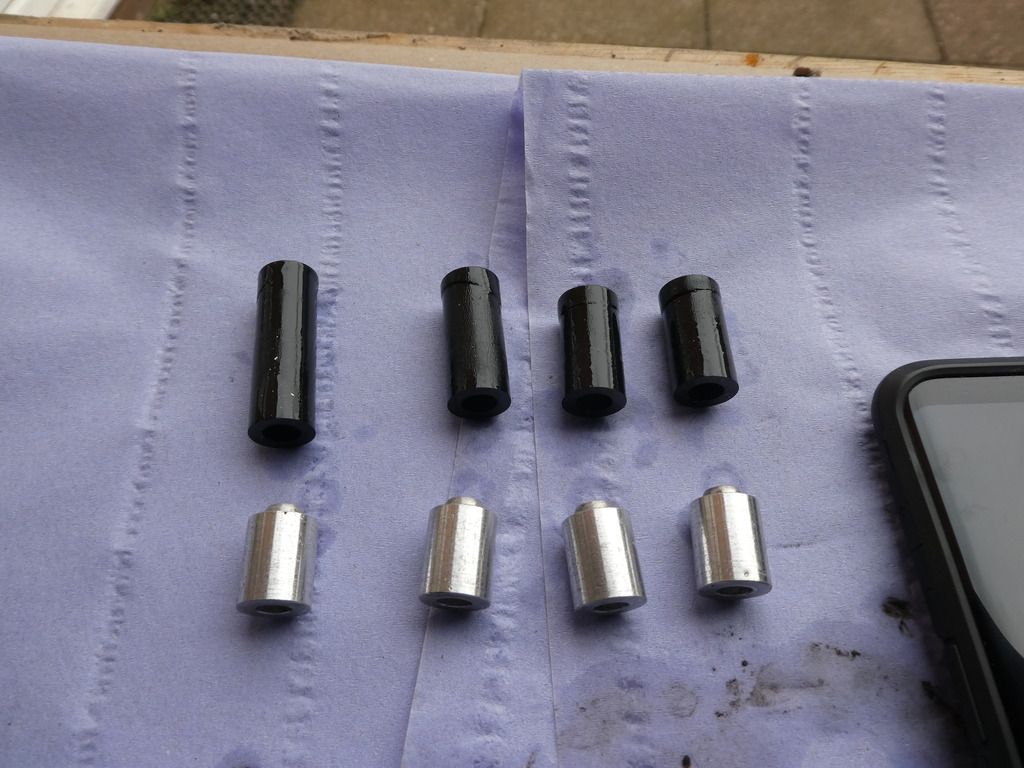
Now remove the aluminium tubes from these ports that interface the pressure lines to the clutches; if you look closely you will see marks on the top faces; these should be squeeky clean, marks are suggestive of oil passing between the mating faces. These tubes sit on top of rubber tubes hidden within these bores that are meant to keep these mating metal faces compressed together, however these rubber tubes are the opposite of what memory foam are, they become tired and the compressive force is lost. We will extract and measure these rubber tubes later for comparison against the new lengths
Image
Image

Now we can measure these lengths for comparison later; and be aware there are 3 different lengths of these tubes
Image

Image
Last edited by ATinOf on Mon Sep 03, 2018 9:32 pm, edited 4 times in total.

ATinOf
3rd Gear
Posts: 444
Joined: Fri Jul 06, 2018 7:32 pm
Location: Cheshire

Re: Gearbox Teardown & Refurbish - 6HP28A61

Post by ATinOf » Mon Sep 03, 2018 12:36 pm

Next we need to know what code the valve body gasket plate is as there are more than one code; in our case it is A063/B063 (the A denotes one face the B the opposite face; it is basically an 063 coded plate). Ordered. Obviously if you are not intending to open up the valve body you dont need one.
Image

Now the oil I drained is filtered we can inspect the filters; I used a large coffee filter for about every 3 or 4 litres of oil filtered
Image

As you can see here there is nothing of great concern showing on the filters, which all aids in the diagnosis
Image
Image
Image
Last edited by ATinOf on Mon Sep 03, 2018 9:37 pm, edited 3 times in total.

ATinOf
3rd Gear
Posts: 444
Joined: Fri Jul 06, 2018 7:32 pm
Location: Cheshire

Re: Gearbox Teardown & Refurbish - 6HP28A61

Post by ATinOf » Mon Sep 03, 2018 12:39 pm

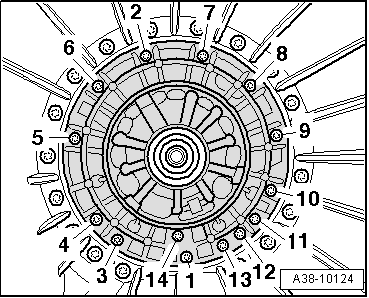
Now to the nitty gritty of getting the clutch packs out, starting with the oil pump housing. ** NOTE the pump housing also has a sequence for undoing the bolts to prevent introducing warp** there are 14 Torx T27 screws with U-Sit sealing washers. Start at 14 thro to 1.
ImageImage

Its not easy to pull out of the box either; if you dont get sufficient grip then be inventive, jubilee clip and insulation tape works for me - or you could always buy the ZF tool
Image

On inspection we can see this bush is quite scored, deffinitely be replacing the bushes
Image

Now lift out 'body II' which consists of Clutches A and E, and be forewarned there is a selective shim washer sitting on the top face of 'body II' which is sized to provide the axial play correctly, don't lose it!
Image

That's clutch B next up
Image
Last edited by ATinOf on Tue Sep 11, 2018 9:31 pm, edited 7 times in total.

ATinOf
3rd Gear
Posts: 444
Joined: Fri Jul 06, 2018 7:32 pm
Location: Cheshire

Re: Gearbox Teardown & Refurbish - 6HP28A61

Post by ATinOf » Mon Sep 03, 2018 12:43 pm

Remove the needle bearing from the top of Clutch B and inspect it, this one was fine
Image

You can see I make prolific use of the blue paper towelling rolls for soaking up oil spillages;cleanliness is key
Image

Now lift out clutch B by gripping against the friction plates
Image

That's half the guts already!
Image

Image
Last edited by ATinOf on Tue Sep 04, 2018 1:49 pm, edited 4 times in total.

ATinOf
3rd Gear
Posts: 444
Joined: Fri Jul 06, 2018 7:32 pm
Location: Cheshire

Re: Gearbox Teardown & Refurbish - 6HP28A61

Post by ATinOf » Mon Sep 03, 2018 12:45 pm

Now ZF have a nice puller tool that you use with a crane lift (I know, WTF?) which pulls 'body I' out all in one piece. Now the first thing you do when its out is break it down to its modular pieces, so why not do that now as you remove it and not bother with the puller and crane, exactly my sentiment...

Now top tip here is to remove the large circlip retaining 'body I' in position, which is NOT what I did (as I didnt refer to the documentation at this point, doh);whereupon you can withdraw clutch C and D assembly; what I did was remove the circlip holding the frictions and steels to Clutch C :oops:
Image
Image

And then pulled the frictions and steels out from Clutch C
Image
Image

Image
Last edited by ATinOf on Tue Sep 04, 2018 2:00 pm, edited 5 times in total.

ATinOf
3rd Gear
Posts: 444
Joined: Fri Jul 06, 2018 7:32 pm
Location: Cheshire

Re: Gearbox Teardown & Refurbish - 6HP28A61

Post by ATinOf » Mon Sep 03, 2018 12:48 pm

Its at this point I recognise my fubar and as I am pointing clearly here - now have to remove said large circlip holding 'body I' in position against the gearbox body :oops:
Now you have to be careful that you dont deform this clip on removing it; carefully work it out round the recess, you have to reuse this
Image
Image
Image

And I can now pull out Clutch C and D assembly (which could have come out with its frictions and steels in place!)
Image
Image
Image
Image
Image

As you withdraw Clutch C and D assembly you are highly likely to hear the 2 retaining blocks holding this clutch body static against the gearbox body fall out and drop into the sun gears below. Dont panic, its bound to happen and they are such a size as to be quite easy to retrieve and not lose
Image
Image
Image
Last edited by ATinOf on Tue Sep 04, 2018 2:08 pm, edited 5 times in total.

ATinOf
3rd Gear
Posts: 444
Joined: Fri Jul 06, 2018 7:32 pm
Location: Cheshire

Re: Gearbox Teardown & Refurbish - 6HP28A61

Post by ATinOf » Mon Sep 03, 2018 12:51 pm

The bench is getting quite full!
Image

Pull out the planetary sun gears with the frictions and steels of Clutch D
Image
Image

Looks like I left the first steel plate behind; withdraw this too
Image
Image

Image
Last edited by ATinOf on Mon Sep 10, 2018 9:26 pm, edited 3 times in total.

ATinOf
3rd Gear
Posts: 444
Joined: Fri Jul 06, 2018 7:32 pm
Location: Cheshire

Re: Gearbox Teardown & Refurbish - 6HP28A61

Post by ATinOf » Mon Sep 03, 2018 12:53 pm

Now pull out the planetary gear annulus and output shaft assembly
Image
Image
Image

As you can now see the guts of the gearbox are out
Image
Last edited by ATinOf on Tue Sep 04, 2018 2:18 pm, edited 2 times in total.

ATinOf
3rd Gear
Posts: 444
Joined: Fri Jul 06, 2018 7:32 pm
Location: Cheshire

Re: Gearbox Teardown & Refurbish - 6HP28A61

Post by ATinOf » Mon Sep 03, 2018 12:54 pm

Check the action of the mechanical park lever is sound, if it operates smoothly and the spring is effective there is no need to disturb it
Image

Inspection of the output shaft double seal shows that the seal is compromised, it has folded over. This double seal seals the gearbox fluid top side and the transfer box fluid bottom side
Image
Image

This explains why some bodge merchant has gobbed up this vent hole; that runs into the cavity between the 2 seals so that a leak reveals itself (hopefully before a catastrophic seal failure). Clearly the last guy to work on this spotted the leak and instead of resolving it gobbed some sealant in there. This sealant has to be removed when we clean the gearbox body up.
Image
Last edited by ATinOf on Tue Sep 04, 2018 2:26 pm, edited 3 times in total.

ATinOf
3rd Gear
Posts: 444
Joined: Fri Jul 06, 2018 7:32 pm
Location: Cheshire

Re: Gearbox Teardown & Refurbish - 6HP28A61

Post by ATinOf » Mon Sep 03, 2018 12:56 pm

Now to tear down each of the clutch assemblies; in no particular order, just the order they sit on the bench. Starting with 'body II' which for convenience, as I dont have the ZF stands for the assemblies :? , I have stood in the workbench so the shaft passes through the middle of the workbench and it sits flat; again note the bench has the blue paper towelling down to soak up any spillage and keep it clean.The input shaft (Pump end) is facing downwards

Remove the flange washer
Image
Image

To keep a sense of order on components I lay them in a box in layers separated by paper towelling; so I know what goes with what (besides the myriad of photos to help of course)
Image
Last edited by ATinOf on Tue Sep 04, 2018 2:51 pm, edited 4 times in total.

ATinOf
3rd Gear
Posts: 444
Joined: Fri Jul 06, 2018 7:32 pm
Location: Cheshire

Re: Gearbox Teardown & Refurbish - 6HP28A61

Post by ATinOf » Mon Sep 03, 2018 1:00 pm

From the top face of Clutch B remove the needle bearing and inspect it for damage and wear; this one is fine
Image
Image

Since this rides against the flange they sit together in the box
Image

Turn Clutch B over
Image

And remove the topmost rectangular section seal of the pair on the shaft above the needle bearing
Image
Image

Followed by the bottom seal
Image
Image

I'm replacing all the seals but I will keep these in sequence so that I can match them up with the replacements later
Image
Last edited by ATinOf on Tue Sep 04, 2018 2:55 pm, edited 5 times in total.

ATinOf
3rd Gear
Posts: 444
Joined: Fri Jul 06, 2018 7:32 pm
Location: Cheshire

Re: Gearbox Teardown & Refurbish - 6HP28A61

Post by ATinOf » Mon Sep 03, 2018 1:01 pm

Now unclip the needle bearing and inspect it for damage and wear, no problems here
Image
Image
Image

Inspect the shaft for wear; even wear as seen here as slight polishing is expected, run a finger nail down the wear face if there is a score or a scratch of concern you will feel a ridge against your nail; this one is fine
Image
Last edited by ATinOf on Tue Sep 04, 2018 2:57 pm, edited 2 times in total.

ATinOf
3rd Gear
Posts: 444
Joined: Fri Jul 06, 2018 7:32 pm
Location: Cheshire

Re: Gearbox Teardown & Refurbish - 6HP28A61

Post by ATinOf » Mon Sep 03, 2018 1:04 pm

On the rear face of Clutch C remove the needle bearing and inspect, so far all needle bearings are in good nick on this box
Image
Image

Notice we've started a new layer in the box
Image

This is the clutch D pack removed from the 'body I' sun gear assembly; for now I am keeping them together in original order for later inspection; a quality street tin is an excellent size for the 6HP28A61 clutch packs;and mark it so you know which one it is - there are clutch packs using the same size frictions and steels in this box...
Image
Image
Last edited by ATinOf on Tue Sep 04, 2018 3:03 pm, edited 4 times in total.

ATinOf
3rd Gear
Posts: 444
Joined: Fri Jul 06, 2018 7:32 pm
Location: Cheshire

Re: Gearbox Teardown & Refurbish - 6HP28A61

Post by ATinOf » Mon Sep 03, 2018 1:12 pm

Now onto the planetary sun gear assembly; remove the flange washer from the top of the inner gear
Image

Followed by the gear itself (ZF also have a tool for removing these gears, but its easy to do by hand :? )
Image

Now with the aid of a small pick unclip the central needle bearing and inspect it, again this one was good
Image
Image

Now the observant ones out there will notice this box is full all of a sudden,its just the way the pics come out guys, there's nothing hidden in there; we will get to it all at some point!
Image

Now remove the lower gear, again its easy enough with fingers with a little tension and twisting motion
Image

Now notice this also has a needle bearing on the bottom face which is exactly the same size; if you are renewing these it doesnt matter which one goes where, but if you are reusing its wise to keep them where they came from as the wear faces will then match. To this end I identify the bottom one by putting it in a plastic food bag, simples
Image

Image
Image
Last edited by ATinOf on Tue Sep 04, 2018 3:43 pm, edited 7 times in total.

Post Reply

Return to “RS6 / RS6 Plus (C6 Typ 4F) 2008-2010”

Who is online

Users browsing this forum: No registered users and 42 guests