
This isn’t too bad a job if you’re a bit confident with spanners and have all the right tools. Don’t even attempt this if you don’t have all the special tools I mention.
I’m going to break this down into:
1. Bumper removal
2. Lock carrier into service position
3. Timing belt change
Before starting you need to familiarise yourself with the Audi procedures. This guide is only intended as a complement with some tips and photos.
You’ll need all the tightening torques and stuff from the proper procedures.
Also, I decline any responsibility from anything bad that happens by following these instructions. Do so at your own risk and peril. When it all goes swimmingly, however, and you are overcome with an immense feeling of well-being, then don’t hesitate to send some beer or other goodies in my direction.
Let’s go…
Tools:
You will need a fairly complete set of sockets and a couple of torque wrenches. In particular for the tensioning of the timing belt you will need a small torque wrench that can do 6Nm in reverse. Not all of them can limit torque anti-clockwise.
You will also need lots of Torx and Allen bits for your socket wrench.
Get the special tools for the job. I highly recommend renting Chris’s tools which are top notch and Chris is a top bloke, too:
http://forum.rs246.com/viewtopic.php?f= ... 02#p582102
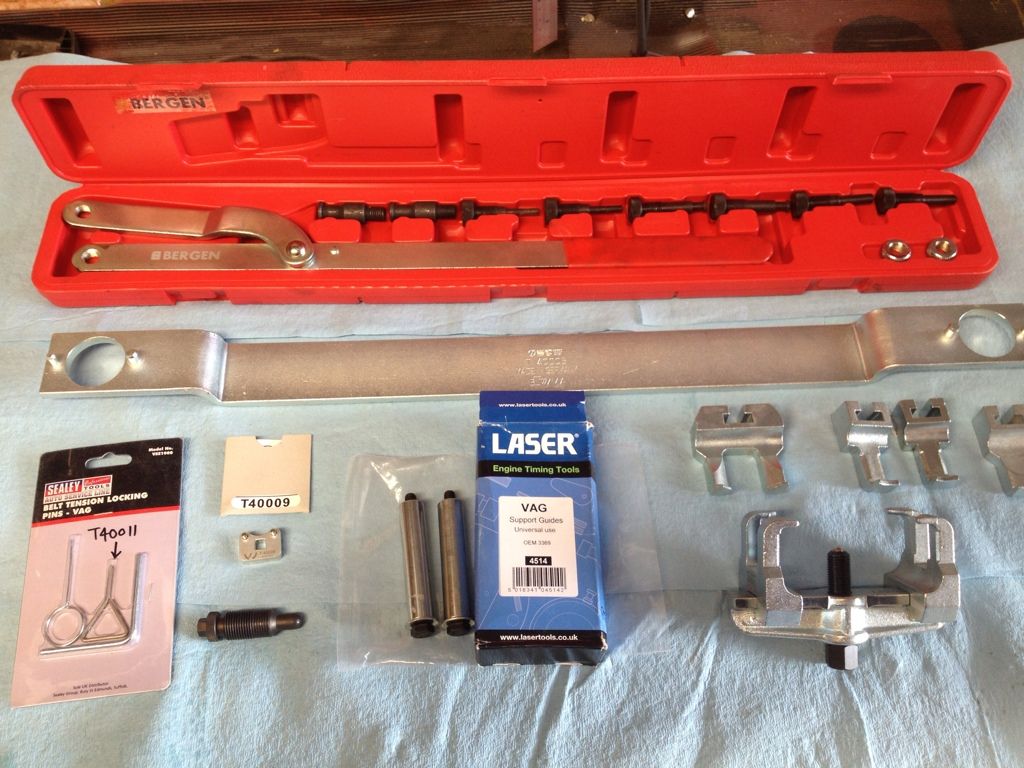
Other bits you will need that you might not have knocking around:
- 32mm socket for turning the crank
- Magnet on a stick. OMFG these are useful. I can’t believe how much I needed it for this job.
- A mirror on a stick. I used this sooo much for this job. You can’t see squat with the lock carrier in service position.
Parts:
Code: Select all
Cambelt
Parts                           Audi Part number        Qty
Cam belt kit                    077 198 119 A           1
socket head bolt with
hexagon socket head             N 101 947 02            1
belt tensioner damper           077 109 479 D           1
hexagon head bolt (combi)       N 102 056 04            3
Sticker                         028 010 227 E           1


Aux belt
Parts                           Audi Part number        Qty
belt tensioner damper           077 903 133 E           1
socket head bolt with hexagon
socket head (combination)       N 903 151 03            1
poly-v-belt                     077 903 137 Q           1
relay roller bearing            077 115 136A            1
relay roller                    077 903 341             1
protective cap                  077 903 343             1
socket head bolt with
hexagon socket head             N 014 713 5             1


Waterpump
Parts                           Audi Part number        Qty
coolant pump with sealing ring  077 121 004 PX          1
oval hexagon socket head bolt
M6X25                           N 908 277 02            12
coolant regulator               077 121 113 D           1
o-ring 60X3,50 N 901 368 02 1Raise the front of the car. You’re going to have to get under there and have enough room to rage and swear at things. Make sure it’s secure so you don’t get hurt.
Right. First bit… Get the bumper off:
Bumper removal
Remove the 3 Torx bottommost bolts holding the wheel arch trim to the bumper.
Remove also the 2 larger bolts holding the trim to the under tray. You can’t see them in this photo, they are hidden by the tyre.
Do this both sides.

Remove the 4 weird metal bolts holding the front of the under tray to the bumper.
Then remove the other 6 and remove the under tray. Put is somewhere safe.
Put the bolts somewhere safe. You don’t want to lose the under tray because it’s not screwed on properly, they are difficult to get hold of.

You can prise the wheel arch trim out of the way to peek inside. If you are less lazy than me then you can remove the road wheels.

Peeking inside the arch you will see 3 bolts holding the bumper to the wing. You can get these off fairly easily with a 10mm long socket.
Remove the nuts and keep them safe. Do the same on the other side.
Note for reinstallation: There is some play on these bolts. You can align the bumper so that your shut lines are perfect. It’s helpful to have someone hold the bumper in position while you tighten them.
Note: The 3 bolts on the bumper WILL scratch the sh!t out of your wing if you’re not careful when removing / repositioning the bumper. Unless you are a Toshiba robot then the bumper will be wobbling around all over the place and you will be very angry if ruin your paintwork.

Pull the sides of the bumper outwards. It will just unclip. It also just clips back on.

Now the bumper is being held on only by the 2 long bolts going onto the impact absorbers. You access them by pulling the grills off the IC inlets. When you remove these the bumper will want to come off towards you and then flap around and scratch your paintwork (see note above).

Holding the bumper with one hand you will need to unplug the horn, fog lights and headlight washers. Might be some other connectors. Should be obvious. You might want to get someone to hold the bumper while you do this. I was Billy no mates that day so I did it with my spare hand.

The headlight washer pipe separates very satisfyingly when you remove this clip (don’t lose it) :

Looks mean:

Time for a well deserved beer.
If all you’re doing is removing the bumper then refitting is reverse of removal.
Putting lock carrier in service position
You’re supposed to drain the coolant. There seem to be 3 (count ‘em) drain plugs that you need to open / remove to do this. I found 2 of the 3, but couldn’t find the 3rd one. One is the funny plastic cross shape “tap” near the bottom right of the rad. The other is here:

You should probably replace it, or at least the gasket, but I can’t figure out why it was necessary. You don’t get a huge amount out and you have to remove the rad hoses anyway where it all comes gushing out. I suppose if you’re in a workshop you want to be able to collect the coolant so it doesn’t p!ss out everywhere. I had no such preoccupations so if I had to do it again, I would leave these drain plugs alone.
Locate the bottom radiator hose and remove the clip from the connector: (in theory you only need to lift the clip 1cm but I preferred to remove it together.

Pull the pipe off. Feel free to start swearing at this point.
If you are reinstalling: swear some more. Swear again.
A lot of fluid will come out at this point. I removed my awesome R8 coolant cap to allow air in and allow the fluid out faster.
Remove the air box (see FAQ for plug change).
At this point I spotted the first of the shoddy jobs that Audi did last time they had the car:

This really p!sses me off, but to be fair, it is a crap design. I’m getting fed up of buying new ones. I will come back to this later.
Remove the cover to the brake fluid reservoir. It pulls off easier when you spread the sides slightly. This will expose the untidy array of connectors going to the lock carrier. I’m led to believe later cars have a slightly different holder.

Either way, disconnect it all. Take some photos to remind yourself how it goes back together so as not to make it even more untidy.
I have a strange octopus:

Undo these 2 bolts (do it on both sides):

There’s a 3rd one under each headlight you need to remove, too:

Put the lock carrier slider tools in place:

Remove the 2 impact absorbers (T45):

They are held on with pointless clips. Remove them:

I didn’t bother to put them back.
Remove the top radiator hose:

Later cars might have an extra hose to remove, too. Not sure. It should be fairly obvious when you’re in the thick of it.
Now the lock carrier is being supported on the special sleeve tools only. You need to tease it forward. Be careful. There are lots of places it can snag. Don’t force it and be vigilant. I damaged my headlight adjusters when they got caught under the wing. Wow is that plastic soft:

Also, be careful of the paintwork on the wing. The lock carrier gets uncomfortable close to it. I covered potential rub points with insulation tape and stuff a sock between the lock carrier and wing, to be on the safe side.

Liberate the bonnet release cable:

Lock carrier in service position:

Treat yourself to another beer.
I took this opportunity to fix the inlet funnels. I heated up the plastic with a hairdryer and inserted a piece of 100mm PVC plumbing pip in there to give it shape. It was a perfect fit.

Result is just ok:

When I put it back on, a slight tightening of the jubilee clips it tries to deform again. In retrospect I should have cut a 2cm length of 100mm PVC pipe and left it in there. It would have strengthened it nicely. I’ll do it next time.
Cambelt change
Remove the air hoses from the DVs:

Loosen the boost hoses from the air guide. Make sure that they are free and not sticking to the aluminium. Do this both sides.

Remove the air guide. There are 4 Torx bolts. These 2 are quite deep, the other 2 are hard to see. The mirror on a stick will come in useful here.

Throttle body exposed:

Now we need to get the serpentine off. If you’re going to refit it (cheap ass) then mark the direction its going and put it back the same way.
Use a 19mm socket to compress the tensioner, release the tension on the belt and then pull the belt off.

Now unclip and remove the upper timing belt covers:

The timing belt is exposed:

It’s as good a time as any to get the engine at TDC. Use the 32mm socket on the crank. Only turn clockwise.

It’s pretty easy to see when you are at TDC:

Make sure that the cam brackets are lined up with the big holes innermost. If the big holes are outermost then turn the crank another 360 degrees.
Now we need to get the crank locking tool in. It needs to go in a hole that is in the most ridiculous location. To even see it you’re gonna have to remove a bunch of stuff.
Remove the bottom boost hose on the left side (direction of travel):

Pretty sure you have to remove the 2 U-brackets that hold the ARB. Can't remember if it was for this job or another one. Just remove the 4 locking nuts and let the bar droop.
Remove this bracket:

Remove these bolts so that you can move the oil pipes around a bit:

Now you have to remove the metal boost pipe that snakes behind the subframe. There are 2 bolts that hold it on behind those oil pipes you just freed. Remove the bolts and remove the boost pipe. It was a pain to get back in, but then I was replacing the OE with the Wagner and the latter were way too long. I had to cut a good inch off to get it to fit:

Once it was the right length, it went in fine. You might find it easier to lube the mating surfaces with water (or spit in my case). Don't use oil.
There’s the bugger we're looking for:

Remove it. You should get a new gasket for it.
Put the crank lock tool in the hole and screw it in as far as you can. You need to make sure your engine is already at TDC or it’s never going on.
Feel free to swear a lot while doing all this.
Crank lock tool in, let’s check the current timing:

Perfect.
Remove the crank pulley. The mirror will be useful again. Can’t remember if they are Allen or Torx. Allen I think. Anyway, remove the 8 bolts and the pulley will come off very easily.

When the pulley is off, remove the lower timing belt cover to expose the whole lot:

You are going to release the tension on the timing belt. Use an Allen key / socket and long breaker bar. Don’t do it yet. Explanation first: By turning the key anticlockwise you compress the tensioner cylinder. It’s difficult to compress because you are working against a shock absorber. Don’t go nuts, just apply some torque (quite a lot, actually) and hold it. The cylinder will slowly compress as the oil inside moves out the way. There’s no point going bonkers trying to compress is quickly, you will just break something. When it is fully compressed, you are going to insert the locking tool. Have it ready.

And now the locking tool goes through the access hatch (remove rubber grommet first), through the outer (fixed) bit of the tensioner then through the piston and out through the other side of the outer bit. It will be obvious when you are looking at it:

Just be patient.
The belt should be a bit slack now. Time to remove the cam pulleys. They are bolted down extremely tight. You will need a breaker bar. Use the pulley retainer to apply a counter torque to that you don’t stress the crank / crank locker tool. Don’t attempt to undo the bolt without something to apply counter-torque.

Remove the bolts and bracket underneath. You will need new cam bolts. And new brackets.
Use the special tool to pull the cam pulley off. Careful, once it’s liberated of the taper it’ll want to fly off.

You will sh!t yourself as this point because the left cam will suddenly jump about 30 degrees out of alignment. Do the same both sides (not the sh!tting self bit).
Remove the belt. If you’re planning on putting it back in, then you are nuts. Get a new belt.
We need to replace the tensioner. If it fails then it’s game over. Inexplicably, it’s not included in the Audi cam belt change kit, so you need to order it separately (and it ain’t cheap). At this point, when you come to remove it, you will discover the omission from the procedure… The bolts are hidden behind a large bracket. You’ll need to remove it to get access. I just unbolted the engine mount it’s attached to and pushed it out the way. You can get enough access to access the tensioner bolts.

Tensioner bolts exposed:

But wait! The tensioner lock tool goes through that bracket! Yup, you’re gonna have to compress the tensioner again with the Allen key while you remove the locking pin and push the bracket out the way. Then replace the pin.

Replace the tensioner.
Because we are not stupid, we are going to change the thermostat and water pump while the belt is off. It’s laughably easy to do at this stage. Unclip the hose going to the thermostat housing and release the pipe.

There are 2 bolts (well, 3, but you removed one to get the bracket out of the way) holding the thermostat housing on: Remove them:

The thermostat housing can be pulled away from the engine. Careful not to drop the thermostat. Actually, who cares, you’re gonna replace it, right?

Put the new thermostat and gasket in place. Make sure the vent is up (12 o’clock).

Replace the thermostat housing and bolt it on. Put the bracket back on, do the whole palaver with the locking pin again.
Installing all new rollers and pulleys. If any fail then it’s bad news so best to change everything in sight. When you change the eccentric tensioner pulley just nip it up, don’t tighten it. Make sure you are able to easily change its position.

For some reason I didn’t take any photos of the water pump change. It’s very easy to change, just make sure you don’t forget a bolt and make sure you clean the mating surface on the engine before fitting the new gasket. There are lots of bolts in funny positions. The mirror on a stick will help again here.
Now install the new brackets and cam bolts. Put grease under the heads and washer of the bolts. Grease the threads also. Only nip them up enough to make sure everything is in position and stable. We need to make sure that the cam pulleys are still able to rotate on the tapered shafts at this point.
You can see the big hole in the bracket innermost.

See how far the left cam jumped? If you didn’t have all the tools for the timing you’d be panicking at this point.

Now feed the new timing belt into position. There’s an order to it. Follow the official procedure. Your tensioner piston is still restrained by the locking pin at this point. New cam belt on:

At this point make sure you put the cam timing tool T40005 in position. Remember that cam that jumper out of position? You’re going to have to wind it back to get the tool on. I used the T40005 itself as a lever to bring it horizontal and pop it into the holes on the right cam bracket (thanks for the tip, Chris).
Now this bit is a bit odd and a slight faff… It doesn’t help that I appear to have taken no photos so I’ll do my best to describe it.
We are going to pretention the timing belt. Take a lot of care over this bit.
With the locking pin still in place, put a 5mm Allen key between the piston and the tensioner pulley lever (this isn’t the eccentric tensioner, we’ll come to that) and make sure it stays in position. (see photo above).
Now we’re going to use the T40009 tool to turn the eccentric pulley to pretension the belt (remember we made sure it was free to turn).
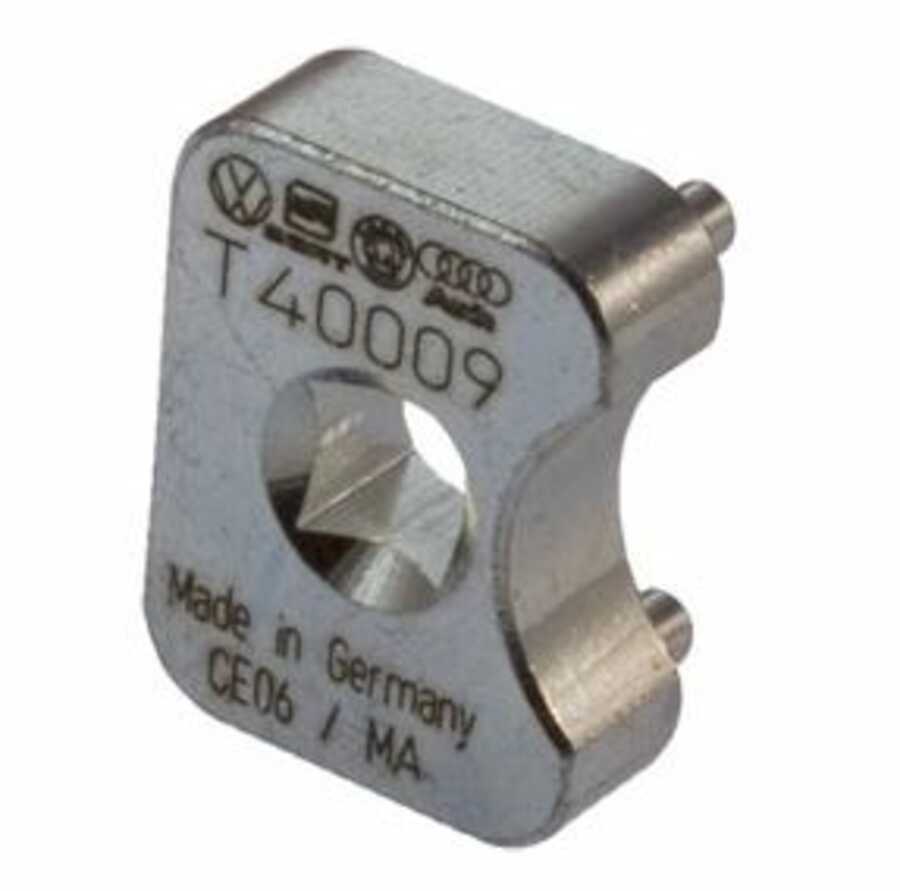
This is the bit that requires the torque wrench that can work in reverse. You are going to turn the T40009 anti-clockwise to tension the belt. We need to put 6Nm of torque on it to pretension correctly. While maintaining 6Nm of torque, you need to tighten up the bolt of the eccentric pulley. You’ll need to tighten it up a lot to stop the pulley from slipping back once you take the torque off. Don’t fully torque it up yet, though, you might need to do it again in a minute (I did it about 3 times before being satisfied) and they are one-time use bolts.
At this point, the cams are locked in the correct position with the T40005 but the cam pulleys can turn on their taper. If you’ve tightened the cam bolts up too much then the pulleys won’t be free to turn.
By the way, don’t think you can get away with not removing the cam pulleys and resetting them this way. Your timing will definitely be out.
When you are happy that the eccentric pulley is in the right position, and the 5mm Allen key is still in place then you can tighten up the cam bolts. Use the correct torque.
Now time to remove the tensioner cylinder locking pin for (hopefully) the last time. Use the Allen key to compress the piston again to allow you to remove the pin then gently let the piston extend fully, tensioning the belt.
If you have done it right then there will be a 5mm gap between the tensioner pulley lever and the fixed outer lip of the tensioner cylinder. Tolerance is 4mm min, 6mm max. It’s a bit of a pain to measure, but when I did mine, it was pretty close to 5mm.
Now remove the crank lock tool and the cam lock tool. Turn the crank 2 full revolutions and back to TDC. Put the crank lock tool back in. Make sure that the cam lock tool goes back on the cams perfectly. I did this a couple of times to make sure.
Remove all the tools again.
Double check everything is torqued up correctly. The big tensioner lever needs a lot of torque, IIRC. I was vaguely worried when torquing it.
That’s it, timing belt on and tensioned. You should have changed all the pulleys and tensioners so you can breath easy for another 5 years.
Now time to get the vast amount of ancillary bits back on and tidy up.
Refitting is pretty much the reverser of removal, with a few caveats:
Put the crank lock tool back in.
Put the bottom timing belt cover in place. Now bolt the crank pulley on, but leave it loose.
You will see that with the crank lock in place, there is quite a lot of play in the crank pulley. To aid future TDC setting, make sure that the timing mark is nicely centred on the notch before tightening the 8 bolts.

Look how much play there is on the pulley with the crank locked:

Put the other covers on:

I replaced all the pulleys and idlers of the serpentine belt, too. In for a penny in for a thousand pounds…
When you refit the serpentine, respect the direction you marked (if refitting the old belt). Use the 19mm socket on the tensioner to allow you to slip the belt on. There is an order to the pulleys you slip it over. Follow the procedure.

Make sure the belt is properly aligned on all the pulleys then release the tensioner.
At this point I pulled fuse 29 and turned the engine over on the starter to make sure everything looked hunky dory.
That’s about it. Refit everything in reverse order. Be extra careful when positioning the bumper not to scratch your paint.
Make sure you torque everything to the specified torque (especially things like pulleys, idlers, water pump bolts, etc).
Don’t forget to fill up the coolant.
You might have some codes from unplugging stuff. Clear the codes.
Check the cam timing with the Vagcom when you are in a position to run the engine. If you go to group 93 then you should have between -6 and +6 degrees on each cam. 0 is perfect. Mine was oscillating between -0.5 and 0 on both cams so I’m pretty happy with that.
Actually, you might want to do that check before you start to see if it was done right last time and if you improved it.
Hopefully I haven’t omitted anything important. Don’t forget to refer to the official procedures when doing this. Any comments / suggestions welcome.


