JamesBaby’s B7 RS4 Avant Daytona & Phantom
Re: JamesBaby’s B7 RS4 Avant Daytona & Phantom
Thanks for the heads up on the seals. I'll look into it next time I have the scuttle off. 
JamesBaby’s B7 RS4 Avant Daytona & Phantom
Audi RS4 Avant A4 Rear Wiper Motor
The rear wiper motor on the Audi A4 and RS4 often fails. Sometimes it works erratically other times just stops altogether. Often the issue is that internally it has rusted and seized due to the water getting into the motor. usually because the spray jet (part no. 8E9955985) gets blocked with corrosion. I replaced the lot mine recently.
The part number for the wiper motor is 8E9955711G which superseded 'E'. The Audi part is more expensive but the same part is made by Valeo part number 579603. I got it for £80 delivered online. I tried a cheaper no brand motor and it was noisy, had a different washer fluid connector, and didn't fit properly. Get the Valeo one.
It's not difficult to swap out:
1) Remove the 4 screws that hold the tailgate trim on. Two are under the Safety Triangle. Carefully remove the tailgate hazard light with a trim tool and carefully remove its power connector. With the 4 screws removed pull the trim firmly off. Noting where the metal trim connectors are located and finding any that pop off the trim.
2) Remove the cap on the wiper arm, and the water jet piece, and the 13mm nut holding the wiper arm down. This nut can be seized, but tapping around the circumference of the nut with a screwdriver or similar tool can free it. You may need to use some penetrating oil and come back to it.
3) On the tailgate there is the wiper motor with the washer fluid hose attached. My car had an old style metal clamp which had to be squeezed with some pliers and manipulated loose. This allows the hose to pop off the motor.
4) Remove the 3 x 10mm bolts and remove the power connector. Then remove the old motor. Swap out with the new motor.
5) Refit the washer hose and snugly squeeze the hose clamp. Then close the tailgate and leak test the hose by sending fluid to the rear wiper. Check there are no drips where the hose connects.
6) Refit the trim by locating the metal trim pieces to their holes, and then bang sharply onto the trim to push them home. Refit the 4 screws and the light to the tailgate edge. Reattach the wiper arm.
You must use a new washer jet. Part number 8E9955985. Get the Audi part. I tried aftermarket and they don't fit properly.


I replaced my rear wiper to the more modern looking one from the 2015 onwards A3.

The two trim screws hidden under the warning triangle.


Re: JamesBaby’s B7 RS4 Avant Daytona & Phantom
Great thread and fantastic car James; credit to you mate.
As someone just getting back into RS4 ownership after 7 years away I think I'll be referring to these pages over the next wee while!
As someone just getting back into RS4 ownership after 7 years away I think I'll be referring to these pages over the next wee while!
Current;
Porsche 997.1 GT3RS. Pure Orange, ceramics, etc, Sharkwerks exhaust
BMW 2002 restomod; Turbo body kit, S14 M3 Evo engine and lots more
Audi Q3 Black edition Quattro
Previously enjoyed;
Ibis White B7 RS4 Avant : TTS Supercharged 615ps/614 nm
Subaru Impreza 22B
Noble M400
TVR 400SE
Lotus Sunbeam Avon
Porsche 997.1 GT3RS. Pure Orange, ceramics, etc, Sharkwerks exhaust
BMW 2002 restomod; Turbo body kit, S14 M3 Evo engine and lots more
Audi Q3 Black edition Quattro
Previously enjoyed;
Ibis White B7 RS4 Avant : TTS Supercharged 615ps/614 nm
Subaru Impreza 22B
Noble M400
TVR 400SE
Lotus Sunbeam Avon
Re: JamesBaby’s B7 RS4 Avant Daytona & Phantom
Thank you mate. I plan to keep the page updated with things I do on the car. It’s a restorative and maintenance process.
Sent from my iPhone using Tapatalk
Sent from my iPhone using Tapatalk
Re: JamesBaby’s B7 RS4 Avant Daytona & Phantom
Big refresh of the cars suspension booked this week. Nothing wrong with the car but I steadily built up a stack of parts over the year so I could do a preventative refurb.
I’m changing the standard Super Sport DRC shocks to Super Sport Plus versions. 2MC & 2ME respectively on your options codes if you want to know which your cars came with.
The SS+ sit lower from the factory so I’m hoping they are valved better for a car that’s lowered like mine.
Hoping to install stainless DRC hard pipes if all goes well too. More on that later.
All Top mounts
Full front Meyle HD kit
Full track rods, not just ends
All rear arms
All drop links and ARB bushes
Front wheel bearings
Both front driveshafts complete
Rear Subframe bushes
New bolts etc
Hoping to get pictures and do a write up soon too.

Sent from my iPhone using Tapatalk
Re: JamesBaby’s B7 RS4 Avant Daytona & Phantom
So the car went to Chris at CM Tuning in Halifax for the refurb of the suspension and installation of the DRC stainless steel hardlines.
As with the previous Daytona earlier in the thread I used the Meyle HD kit which is a front end refresh kit which has uprated components. A non HD kit is available too so make sure you get the right one.
Meyle 116 050 0085/HD.
It doesn’t include the inner tie rods, just the ends. So I bought the HD inners separately.

New front and rear drop links and ARB bushes.
New rear arms too. The S shaped arms are a pain to install. They are bolted to a captive nut which likely will become un-captive due to age upon removal. In such case you have no access to rectify it due its location. Only recourse is to lower the subframe.

New top mounts all round too.

Sent from my iPhone using Tapatalk
Re: JamesBaby’s B7 RS4 Avant Daytona & Phantom
Looking forward to hearing if you can notice any difference between the SS and SS+ dampers, as effectively this will be a back to back test!
Still running the KW HAS springs? What height did you go for, SS+ at the back and a bit lower at the front to eliminate the arch gap?
I am almost dreading picking mine up and finding it runs too hard on the SS+ setup vs the KW V3's that came off!
Still running the KW HAS springs? What height did you go for, SS+ at the back and a bit lower at the front to eliminate the arch gap?
I am almost dreading picking mine up and finding it runs too hard on the SS+ setup vs the KW V3's that came off!

Misano Red RS4 B7 Avant
Re: JamesBaby’s B7 RS4 Avant Daytona & Phantom
Thanks for the tip about the seat clips. Just bought new bolsters for my front seats.
B7 RS4 Saloon, Phantom Black, Forge Oil Cooler Kit, 20 x 10.5j Vossens, Carbon Front Splitter, KW V3 Coilovers, Adjustable Front Arms, 20mm Spacers, Revolution Carbon Air Box, Rear 4 Pot Porsche Brake Conversion, Stud & Nut Kit, Milltek Non Res Non Valved Exhaust, RS6 Gloss Black Grill, Slightly Tinted Windows, JH Motorsports Stage 3R Clutch & Lightweight Flywheel, Robnic Braided Clutch Line. JH Motorsports Lightweight Grooved F & R Rotors with Braided Hoses and Hawk Pads
JamesBaby’s B7 RS4 Avant Daytona & Phantom
RS4 B7 DRC - Dynamic Ride Control Suspension.
Lots has been said about the RS4 DRC. The early factory supplied parts were weak and prone to failure. I love the DRC and have driven cars back to back with coil overs and prefer the original car with DRC.
The DRC shocks were revised in 2013 and in my opinion are less liable to fail. You can tell if you have later ones if the parts end with the B or E if you have standard Supersport DRC shocks, or C and F of you have Supersport Plus option which were 10mm lower.
Option codes are 2MC for SS and 2MC for SS+ so you can check that in the boot or the service manual.

Another established issue are the DRC hardlines. They are like fatter brake pipes carrying the hydraulic fluid to the shocks and valves.
Here’s one of the old rear ones:

These pipes are mild steel and can rust and burst. Especially in hidden areas like above the fuel tank. They are not cheap to buy at around £1,300+ for a set of 4. The two front ones are 2.7m long !!


I have had the DRC pipes made in stainless steel. They are available for sale from me for half the cost of mild steel originals.


I had these installed by Chris CM Tuning in Halifax. He has the DRC recharging tool. It’s a rear subframe and fuel tank out job. Hence the refurb of the rear arms and bushes mentioned earlier whilst I was in there.


The DRC ride comfort is sublime. Despite being lowered on KW HAS the car rolls over the bumps in a compliant way yet it’s perfectly flat in the bends. How a B7 RS4 should be.
A quick trip to Chong of Atec Align in Huddersfield. Chong is a legend when it comes to 4 wheel alignment. Highly recommend him.

So the DRC on my car has been refreshed as well as all the arms etc and it’s been worth it. Drives sublime.
Re: JamesBaby’s B7 RS4 Avant Daytona & Phantom
Simply amazing James! I too came back to the B7 RS4, they're a perfect all rounder!
The DRC rebuild is looking good, especially with the new pipes and junctions!
I decided to stick with DRC on mine too, some for the originality of the thing and mostly the comfort - I have a e92 mSport as a second car and the wife has a GLC, the RS is the more comfortable one out of the pack!
The DRC rebuild is looking good, especially with the new pipes and junctions!
I decided to stick with DRC on mine too, some for the originality of the thing and mostly the comfort - I have a e92 mSport as a second car and the wife has a GLC, the RS is the more comfortable one out of the pack!
Re: JamesBaby’s B7 RS4 Avant Daytona & Phantom
Thanks mate. Yeah I’m loving the car now. Really solid and smooth and the DRC is well worth keeping.
More updates coming.
Sent from my iPhone using Tapatalk
More updates coming.
Sent from my iPhone using Tapatalk
Re: JamesBaby’s B7 RS4 Avant Daytona & Phantom
Look forward to it mate! I need to change my rear wiper too, despite waving at the cars behind it doesn't really do much to clear the screen of water
Re: JamesBaby’s B7 RS4 Avant Daytona & Phantom
So the wheels went off for a refurb so I decided to refurbish the centre caps.
Quite easy to do as the chrome trim and Audi rings come out quite easily.

On the back there are 4 clips holding the chrome ring. By popping two adjacent ones at a time the ring comes away.
The Audi rings have pegs which can be pushed in by a precision screwdriver. Then they come off.

Then scuff up the surface with scotch pad and prime with a primer in light coats.

Then paint several coats of paint, again in light coats.

The apply the lacquer. First a dusting, then a few wet coats.

Allow to dry. I heated in the oven at 50 degrees C for 20 minutes and left to cool overnight.
The final result:


Same colour as my callipers.
Pics with refurbed wheel coming soon.
Sent from my iPhone using Tapatalk
JamesBaby’s B7 RS4 Avant Daytona & Phantom
RS4 B7 Intake Manifold Refurbishment

I recently Carbon Cleaned my car DiY, and I also took apart the Intake Manifold and refurbished it. I refurbished the shafts and the flaps. It was so effective that could barely believe I was driving the same car once I had done it.
Carbon build-up and deleting the flaps. Why I didn’t delete the flaps.
The carbon build-up caused by the Direct Injection setup of the RS4 engine, coupled with the valve timing, is well known on these and other DI cars. The intake manifold on the RS4 B7 is also a well discussed topic by owners. Many electing to remove the swirl flaps from the intake manifold as part of a Carbon Clean process, and/or remapping of the car.
To cut a long story short I am not convinced of the main reason to remove the swirl flaps. There are some documented cases where cars have had engine destruction due to the screws holding the flaps falling into the engine. I am of the opinion you are more likely to total the car in an accident, than a screw or flap fall out and kill it. There are hugely more cases of the latter for sure and the internet has a way of magnifying small voices.
Other reasons why people remove the flaps is due to Manifold Flap Position sensor errors caused by sticky gummed up flaps due to carbon, or excessive play in the shafts that turn the flaps open or closed. Resolving these issues is expensive as the intake manifold is only replaceable as a whole part at a cost of £3,500. New shafts or flaps etc are not available separately so manual refurb of the intake is the only option, or as many do, get rid of the flap system altogether.
I did a full walnut blast of my intake ports, but also stripped the manifold and cleaned it all up. Crucially this eliminated the play which I found in one of the shafts (Bank 2). I was told by a well-known tuner that it was not possible to resolve excessive play in a shaft, but mine were solid after the work which I will detail in the coming posts.

JamesBaby’s B7 RS4 Avant Daytona & Phantom
Here you can see some of the ports of my car. They were really clogged with carbon. My fuel trims in Block 032 in VCDS were around -7 for both banks at the time. The car had too much unburnt fuel at the cats, and thus was reducing the amount of fuel in relation to the amount of air it thought was going in. After the clean they went to near 0% on both banks, so the carbon was preventing proper combustion.


I used this official Intake Manifold removal guide and it was relatively simple to take off the manifold. Just follow the steps calmly and orderly. Important to note that in the guide it says on page 9 that a hard plastic SAI pipe clips at the back of the engine needs to be unclipped to access the lower PCV bolt. They do not, and are almost impossible to unclip. You just need a tiny slim ratchet like this one below to slide in and access the 3rd PCV bolt. The hard pipes are really had to unclip so get this ratchet, it cost me £3.69 delivered of Amazon.
Here is the engine with the manifold off.

Here is the manifold carefully laid upside down. I’ve already removed the shafts here and laid on top.

I wanted to replace the plastic arms that move the flaps for 034 Motorsport Billet Linkage Arms. I got them from Awesome Gti in the UK.
https://www.034motorsport.com/intake-ma ... l-fsi.html
034 Motorsport have a great easy to follow guide on how to fit those arms which also details how to get the shafts out. The arms are supplied with a tool that makes getting the metal plugs in\out easy too. Here is a link, but in case the link dies I've posted the PDF for download. https://www.034motorsport.com/blog/diy- ... -108-z005/
I followed that guide and it went smoothly, but here is some advice:
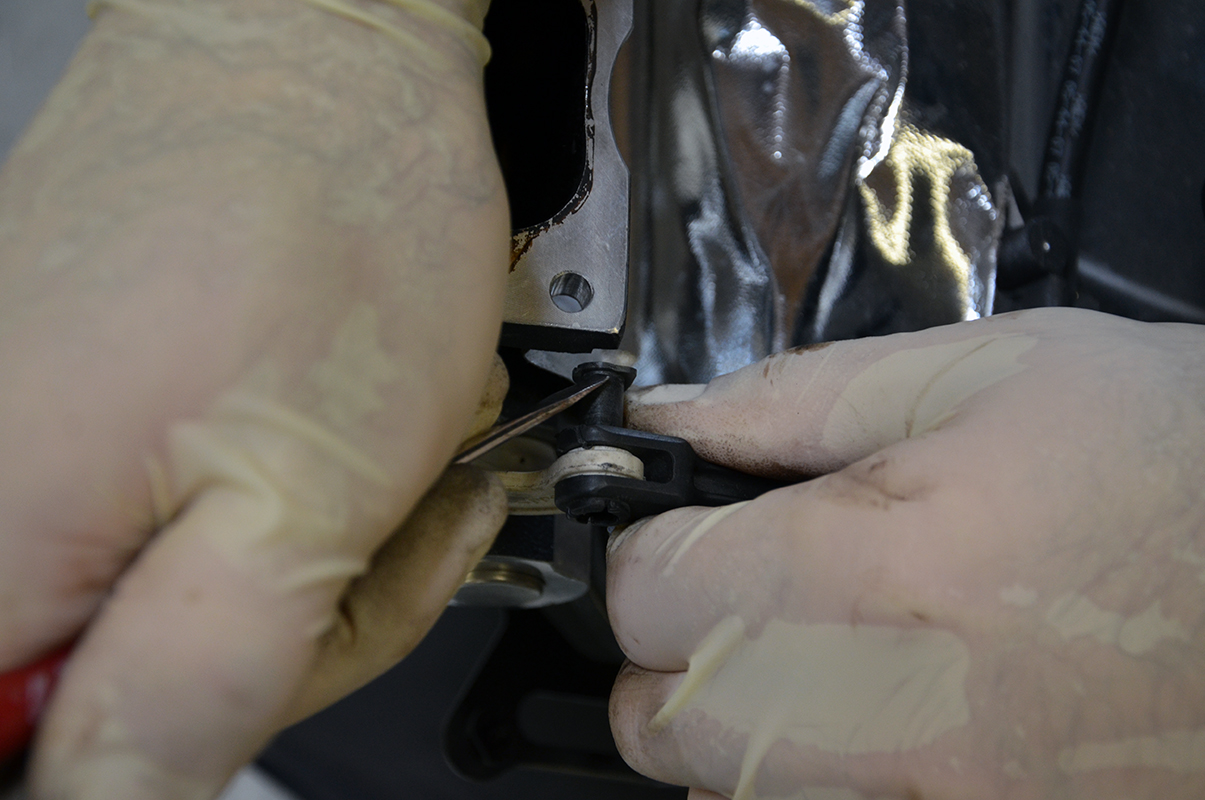
In step 8 linked below, when removing the plastic dowels\pins that the linkage arms are connected to. The image shows the guy prising it out with a screwdriver. Don’t do this. “Push” them through from the other smaller side, rather than attempt to “pull” them out from the other flat\larger side. The plastic is brittle, and you will break them. Once unclicked and pushed free, then you can pull them out from behind.
https://blog.034motorsport.com/wp-conte ... step_8.jpg
Here is an image of the shafts and the plastic arms. The circular silver thing is a cap that goes on one end of one of the shafts in the manifold.
NOTE: The shafts have rubber seals at each end. Don’t lose them and note their orientation for refit. I took pictures along the way so I wouldn’t forget.
These shafts need to be carefully cleaned and all the crud removed from them. I used a scotch pad on some places and brake cleaner. Remove any roughness from the Nylon sections too.
Here are the screws and the flaps after removal and proper cleaning. I soaked them in an oven cleaner chemical overnight. It was a mission. A shot blasting box could have been quicker.
Clean the screws properly and I mean properly. Thread Lock does not like grease, and is more effective in its absence from the mating surfaces.

I also replaced both Manifold Flap Position sensors just for completeness. Vemo part number V10-72-1279 are the same part as OEM but with the Audi detail rubbed off.
As well I replaced the one-way Vacuum valve that sits under the manifold itself. You can see it here the black and white valve.
Pierburg Valve Part Number 7.05817.00.0 is the same part as the OEM one.
Then onto cleaning the actual manifold itself.


I used this official Intake Manifold removal guide and it was relatively simple to take off the manifold. Just follow the steps calmly and orderly. Important to note that in the guide it says on page 9 that a hard plastic SAI pipe clips at the back of the engine needs to be unclipped to access the lower PCV bolt. They do not, and are almost impossible to unclip. You just need a tiny slim ratchet like this one below to slide in and access the 3rd PCV bolt. The hard pipes are really had to unclip so get this ratchet, it cost me £3.69 delivered of Amazon.

Here is the manifold carefully laid upside down. I’ve already removed the shafts here and laid on top.

I wanted to replace the plastic arms that move the flaps for 034 Motorsport Billet Linkage Arms. I got them from Awesome Gti in the UK.
https://www.034motorsport.com/intake-ma ... l-fsi.html
034 Motorsport have a great easy to follow guide on how to fit those arms which also details how to get the shafts out. The arms are supplied with a tool that makes getting the metal plugs in\out easy too. Here is a link, but in case the link dies I've posted the PDF for download. https://www.034motorsport.com/blog/diy- ... -108-z005/
I followed that guide and it went smoothly, but here is some advice:
In step 8 linked below, when removing the plastic dowels\pins that the linkage arms are connected to. The image shows the guy prising it out with a screwdriver. Don’t do this. “Push” them through from the other smaller side, rather than attempt to “pull” them out from the other flat\larger side. The plastic is brittle, and you will break them. Once unclicked and pushed free, then you can pull them out from behind.
https://blog.034motorsport.com/wp-conte ... step_8.jpg
NOTE: The shafts have rubber seals at each end. Don’t lose them and note their orientation for refit. I took pictures along the way so I wouldn’t forget.
These shafts need to be carefully cleaned and all the crud removed from them. I used a scotch pad on some places and brake cleaner. Remove any roughness from the Nylon sections too.
Clean the screws properly and I mean properly. Thread Lock does not like grease, and is more effective in its absence from the mating surfaces.

I also replaced both Manifold Flap Position sensors just for completeness. Vemo part number V10-72-1279 are the same part as OEM but with the Audi detail rubbed off.
Pierburg Valve Part Number 7.05817.00.0 is the same part as the OEM one.

Who is online
Users browsing this forum: No registered users and 54 guests