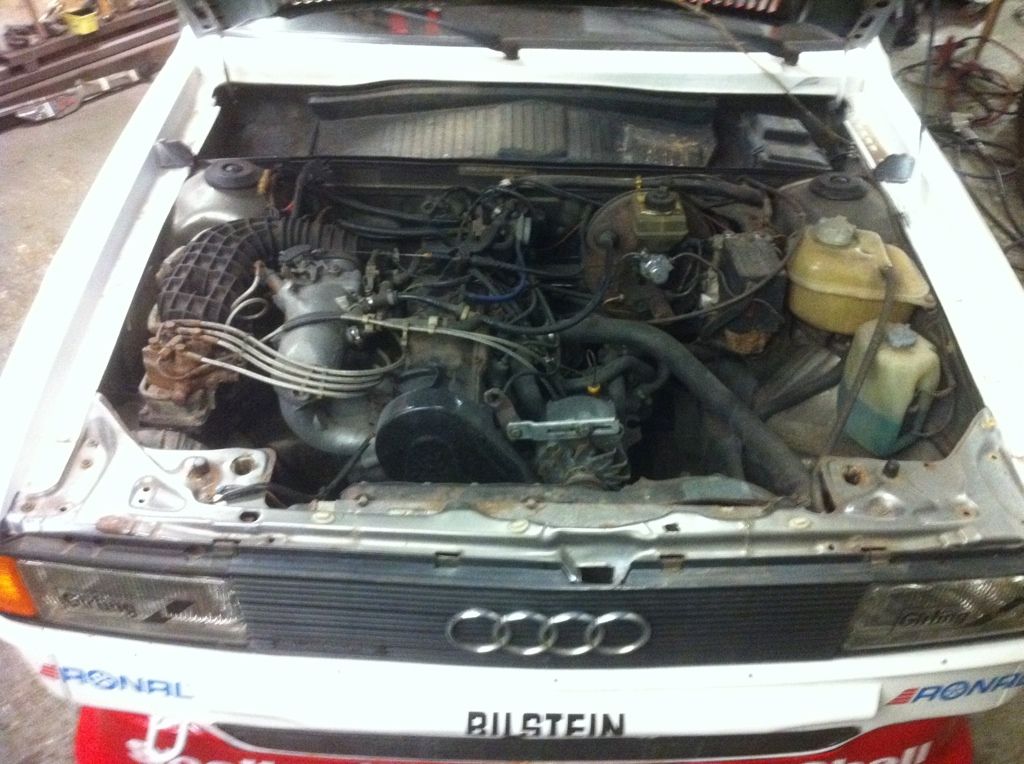
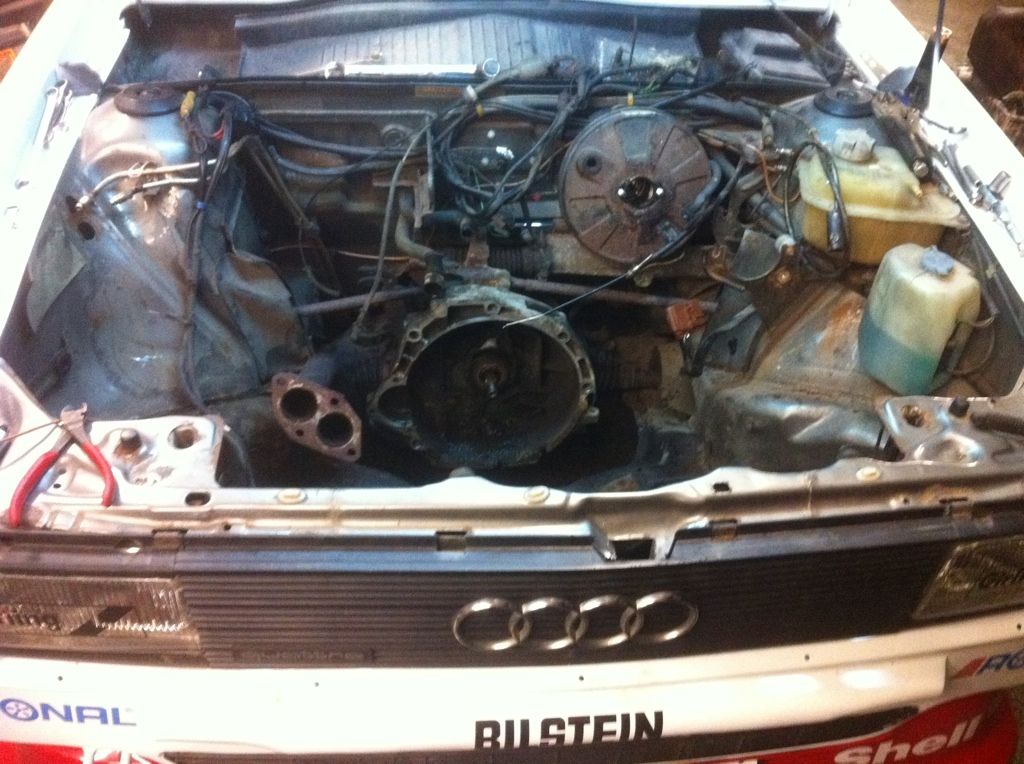
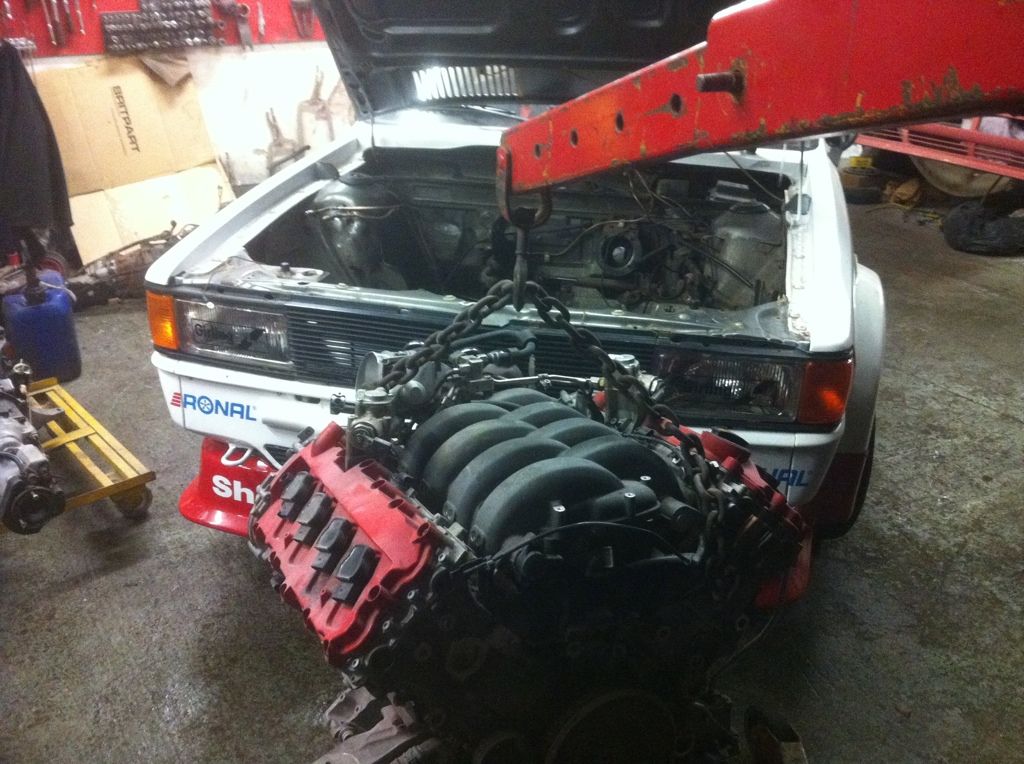
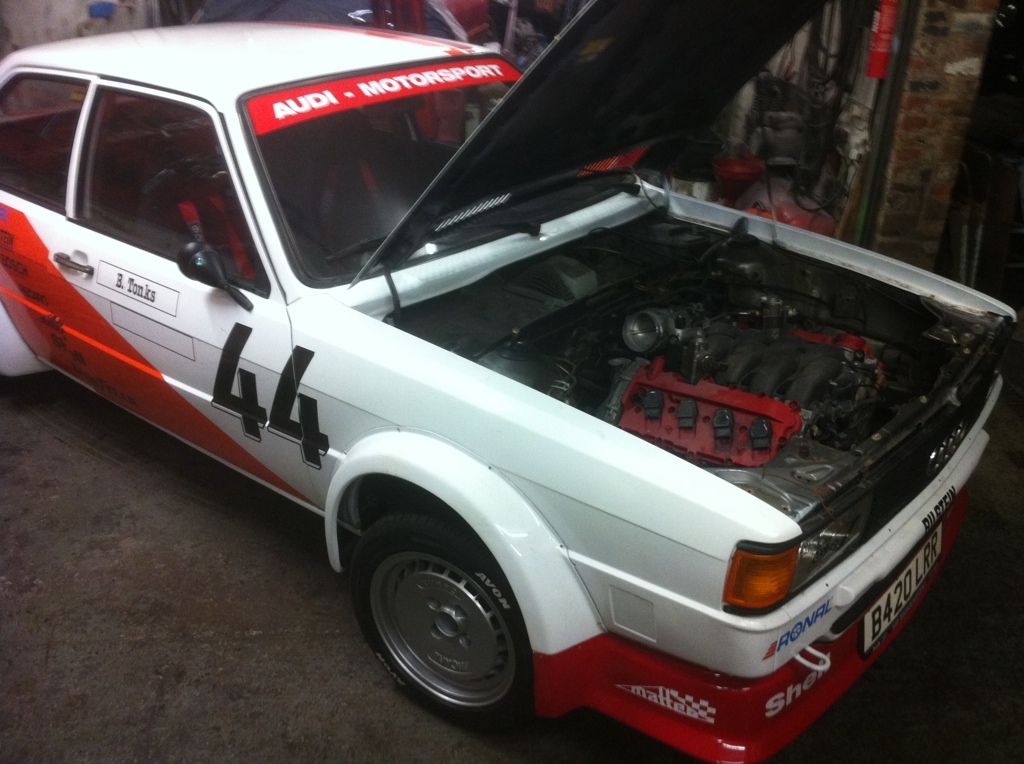
Tonks's 80 2 door quattro RS4 Tourenwagen

4.2 V8 32v Naturally Aspirated - 414 bhp
Tonks4x4
Neutral
Posts: 35
Joined: Sat Oct 16, 2010 3:40 pm

Tonks's 80 2 door quattro RS4 Tourenwagen

Post by Tonks4x4 » Thu Oct 27, 2011 7:49 pm

As some people have requested I repost my build thread from the classic-audi forum, here it is for anyone that is interested.

23-03-2011

Hi guys thought I would start and official thread for this car now....

The Donor....
1985 Audi 80 2 Door Quattro GTE

Image

I bought this little gem in May 2010 from eBay.de and travelled all the way down to virtually the czech border to fetch it, the collection was tied in to a visit to Ingolstadt so that was good. However the car and trailer along with the Audi were towed from the Museum car park which is another story.

Anyhow once it was home there was a large debate as to what to do with it ie 20vt, body kits, or just restore it to it's former glory.

A decision could not be made so I stuffed it into storage for a while.

After some time and a lot of thought I decided even though it was very low mileage 60k km and a full Audi Service History, it was a scabby old bird and needs a lot of work.

Image

This will be a rolling project and I want to keep it on the road as often as possible rather than having a long term project.

So the final aim will be a recreation of the 80 2 door GLE burg cup car which is displayed in the Audi museum.

Image
Image

The original car was a 1.6 and revved to something silly. I hatched a plan that this was not enough of a challenge so I am opting for a B7 RS4 V8 :)

So just before Xmas I posted a wanted add for an engine, and happily I was informed of one for sale so that is now sat in the corner awaiting fitting.

Next was the burg cup kit, as some of you are aware SteveT63 and have just been to Germany again to collect another 2 door for Steve, while we were there we arranged to meet with Mr Schmidt, by all accounts he is the burg cup god! So we made a deal and have ordered the kits, they should be here in the next 3 to 4 weeks.

So now is the time to start on the body prep....

So I'll start with the front valance. Both bumpers have been removed and the lights have been taken out.
More rot is now visible :(
Image
A good clean inside the front bumper housing a dose of KRust and then a lick of primer.
Image
To them make the front look like the cup car most of the holes on the front need to be filled, so the sheet work was cut and welded into place ready for dressing
Image
After dressing the welds it was given a coat of primer so I can see where it will need the filler
Image
After a skim of filler and a sand down
Image
So I now have the other side to do, several holes in the bottom valance to repair and then a final tidy and paint.

Meanwhile I got a little impatient and had a quick play with the other colours to make sure they looked the right colour :)

Image

They look about right so I can sand the rest of the body down and repair all the rest of the scabs and rot but I will keep you posted...
Well I have seen some basket cases but this needs lots of work....
This is the bottom of the passenger door
Image
Image

So had to put some steel back on there to start from....

Image

Nearly finished the front now with all the holes and vents welded closed and the extension caps at either end like the typ81 has but the typ85 doesn't.
Image
Image

24-03-2011

Thanks all...

Well today's progress has been slow as I have had 3 Land Rovers to sort first. The jobs done today are made a start at repairing drivers side sill, some work on one of the nasty rotten doors which still need some work but are a damn sight closer than they were and the fun bit for me is the boot lid has come out pretty well :)
Image
Image

Image
Image
Image
Image

The red looks real dark on my pie phone ????

25-03-11

Well here is today's little instalment, had lots of interruption from paying customers so did not get much done today... It consisted mainly of more welding, more filling, more sanding, more painting followed by more flatting.

Image
Image
Image

However one for Steve..... If you are going for the original stuff to make it look right then I have done some homework on the door mirrors...

HISTORY: The Worlds FIRST Streamlined (Bullet) Mirror was developed by YORCK TALBOT 1956 for the famous Mercedes 300SL and to this day is well liked all around the World and used on many fine cars.

YORCK TALBOT Series 333 MIRROR. Part # 333.01.03.03

That should save you a couple of hours research, however they cost nearly as much as the car :yikes:

Image

But just to rub it in mine are on the way as we speak :finger:

26-03-11

Today's instalment consisted of making my way towards getting it running...

Firstly we need some power so on goes a fully charged battery to see what happens. Well everything powers up which is a good start.
Secondly we need some fresh fuel in there, the tank was drained and 20L of unleaded was tipped in.
However on cranking I could hear a rush of fluid from underneath on closer inspection I have a pair of fuel lines that would be better suited to a sprinkler system in a greenhouse. :lol:

They are rotten from front to back, even the copper repair sections have gone that rotten and green it's leaking also. There were 7 bits of rubber pipe where they had been patched up in the past.

So to cut my losses I have replaced 2 fresh runs from front to back in Cupronickel which is pretty much totally corrosion resistant so I will never have to do them again. I have fitted a second hand fuel pump and filter assembly as they old one fell off with a gentle poke :(

All the brake pipes have been renewed.

Image

On removal of the fuel lines I made the decision that it would be a damn sight easier to get to them in the engine bay if the battery tray was not there. Especially as there will be no room for it when the V8 does go in. So out with the plasma cutter and out with the battery tray.

I have now put the battery in the boot, I will need to make a tray and mount for it. I have fed some new type high amp winch cable through the rear bulkhead, along the floor pan and through the front bulkhead and down the inside of the chassis leg like a UR quattro, so it exits through the grommet right next to the starter motor.

Image

After these bits were sorted it was time to try and start it. Tried cranking several times but no start. I made a school boy error and got the flow and return mixed up, 10 mins later and a quick prime with activating the fuel pump relay manually she fired up.

It sounds like a German tank as there is more holes in the exhaust that a colander so that was next on my list. I didn't have another typ85 quattro exhaust so I have chopped up an old stainless S2 exhaust and welded that in for the time being, again I will have a custom one made when the V8 is in.

Then drove it up the street and back just for a giggle :chit:

And then reversed it in the garage to do some more bodywork.

Most of the back end is now primed there Is a few small patches that need attention.

And then finally to cheer me up and give me motivation the boot lid was placed on to see what it will look like.

I know it won't look right with the facelift rear end but it will do until stage 3 of the refurb, when the early style rear end lands.

Image

27-03-11

Well another 12 hours spent and you can't really see where I have been this time, I have spent a lot of time welding to blank off all the trim holes in the doors and cills and repairing the rotten sections of the cills. I spent quite a long time flatting and filling over the trim holes I have welded up and I have put some more paint on...
Image
Image
Image
Image

[quote=Isimmo;206380]I don't think anyone picked up on the 'V8' hint earlier, now the 'RS4' hint... Have you something sat 'along side', sir?[/quote]

Yes mate it's in the first post my intensions is to fit a B7 RS4 4.2 V8 FSi motor, engine code BNS it's sat in the corner of my garage collecting dust at the minute but has loom ECU's and all the ancills.

I have done my homework on the wiring loom and should be able to run it once I get the ECU's coded to remove the imob.

The engine won't be going in until it's UK Registered as it needs its original engine for registration.

Image

28-03-11

Thanks 90quattro :tup:

Well today's plan was to finish the cills, finish the doors, strip the interior and get the inside prepped and painted and try and finish the paint on the outside. However......

Once the rear interior was out

Image
Image

I spent forever pulling the stupid green fluff off the floor. Then I began to have a poke around to make sure it was all solid but even though it looked spot on under the seam sealer there was another storey.

Image
Image

So I cut out the rot with the plasma cutter

Image

Then welded some steel back in

Image
Image
Image

Then lashings of seam sealer as used by Audi when they built it in the first place

Image

Then followed by 4 hours of cleaning all the sticky stuff of the parcel shelf and rear bulkhead with a Massive Thanks to Ash for lending a hand with the cleaning

Followed by a first coat of Satin Black :)

Image

Looking forward see what the result is like in the morning.

Now off for a shower and clean the black paint from my nostrils lol guess it's time for a new spray mask

29-03-11

My mirrors have been shipped...

Image
Image
Image
Image

And I won these on eBay tonight, need a slight repair and some bases making but cheap and will hopefully look the part ;)

Image

Guess who has a green piece of paper :)

Image

Not had anytime to play with the car but it will be at the pub meet tonight on my trade plates :)

Well it would have been at the pub but.....

The paint is still wet and it's absolutely pissing down now :(

Image
Image

PJC
Cruising
Posts: 4736
Joined: Mon Sep 06, 2010 7:40 pm

Re: Tonks's 80 2 door quattro RS4 Tourenwagen

Post by PJC » Thu Oct 27, 2011 7:55 pm

Wow, what a project.

Tonks4x4
Neutral
Posts: 35
Joined: Sat Oct 16, 2010 3:40 pm

Re: Tonks's 80 2 door quattro RS4 Tourenwagen

Post by Tonks4x4 » Thu Oct 27, 2011 7:55 pm

30-03-2011

Not much done today had a real busy day with Land Rover stuff, but I did manage to have a tinker with fitting my seats and harnesses :)

Image
Image

31-03-2011

Tonights exploits consisted of the front suspension refurb.....
Many thanks to Ian B AKA Bazburn for giving me hand today while his car was in for some body work :)

All the suspension is very tired so it has been replaced with some H&R's to stiffen it up and some new top mounts.

Everything has been de-scaled and painted with black hamerite including the arches.

All new disks and pads should be here in the morning so should get the rear suspension and those fitted tomorrow night

Image

01-04-2011

Today's little stint has turned into a mammoth task...
Both rear springs have also been swapped all the arches painted new top mounts and new disks and pads but I have had 3 lots of front disks and they have all been wrong so will be getting the proper ones on Tuesday all being well.

I think every nut and bolt was seized with lashings of rust on top of more rust.

So everything has had a dose of copperslip and it now drives like a new pin :)

So could not resist stuck on the trade plates, put £30 of fresh fuel in and went out for 10 to 15 miles test drive.

It has a funny issue once warm it starts to miss and cut out. Once restarted it's ok again for a couple of mile and then it does it again. So will have to look at that but it's the first time it has been above 20 mph in the last 5 to 10 years

Image

Must say even with the 1.8 it feels a right nippy little thing with it all stripped out. It seems very tail happy which nearly caught me out on the first few twisty corners :)

08-04-2011

Not done anything for the last 4 days I have had a chassis swap to do on a Land Rover Defender.

But I did manage to get to Nottingham today to the DVLA office and managed to get the car UK registered :) should get my registration next week

Image

Yes Ian I will be blowing the dust of the BIG lump next week to see if I can get it running on the garage floor first :)

And as far as the Ronals go I can't afford a proper set just yet so these will have to do :) they need a refurb but I can sort that....

Image

Well got the final coat of White on today but need to repaint the stripes as there is something wrong with the paint and has still not hardened properly :( however one little thing has arrived today to cheer me up :)

Image
Image

And a pic to compare the original...

Image

12-04-2011

Well it has just sat now for a few days, I am waiting for the paint company to replace the paint for the stripes as it is still not set, the wheels have still not landed, the body kit is still not here, the DVLA has still not issued the registration docs :(

So all I have done is sat and flatted and polished the White here is a pic of the reflection in the paint on the wing at night

Image

13-04-2011

Well some of my waiting is over....

I received my registration details today but that was not as straight forward as it should have been as there were 3 different registration numbers, 1 on the tax disc, 1 on the MOT certificate and 1 on the v948 form??????
So 3 hours of phone calls today finally sorted it :)

Image

The issues with the faulty supplied paint has been rectified and the first lot of new colour has gone on. It's a much better colour match and this time went on wonderfully which after a quick flat and polish produces a good finish

Image
Image

And also my wheels arrived on TNT today :) :) :)

Image

They are desperate for a refurb and need some bigger tyres but can't get them until my arches and the rest of the kit lands! I am getting really impatient now :(
First part of the refurb on the wheels

Image

I am in desperate need of the early front lights, the flat grill and hockey sticks now. As there is graphics on the headlights that I want to get done at the same time as the rest of the car

If all goes to plan the kit should be here Monday, the paint will be fully finished by then and the graphics company have been alerted that it should be with them for the back end of next week, beginning the next.

26-04-2011

Well I have been stuck for parts and the kit has still not landed but he assures me they will be here for next Tuesday...

However a massive thank you to B2AUDI80 for supplying the headlights grill and 2 hockey sticks....

Not a job I want to repeat in a hurry.

Here is the flat front light before...
Image
The reflectors are shot but are the same as the later sloped versions so off with the glass. A nasty job to do my heart was in my mouth for an hour
Image
Then I cleaned the glass to remove all the old adhesive with the bench grinder with a wire wheel in of all things it worked a treat.

Then as I have no need for LHD lenses and did not want to risk damaging the reflector out with a big hammer :)
Image
A quick clean around the new lens with a dremmel to again remove the old adhesive.
And then refit the glass with some silicone adhesive
Image
And then mount to the car with the grill to see what it looks like...
Image

So now off to do the other one...

Just need a nice set of matching indicators and drivers side set of hockey sticks now if anyone can point me in the right direction???

29-04-2011

I have an email today to let me know the arches and front air dam are on a DHL truck currently on the way to me :) at last....

Image
Image
Image


Got the wheels finished off :)
Just need to find some tyres that will look right when the arches have been fitted

Image
Image

03-05-2011

Hurray!!! The kit landed today so ended up playing with the car rather than doing proper work :(

To save on shipping costs from Germany we had the front air dam cut in half so we could join it back together when it got here.

Image

Once the air dam was fixed in position we could make a start on the front arches

Image

Once they were on time to move onto the back end.

Image


Then it shows just how poor the original wheels look, so off to the tyre centre to get some new Avon's.

Image

Once home I mounted the new tyres and fitted to the car

Image
Image

Just need to cut the steel out the arches now. Lower the rear end and fit some spacers....

Tomorrow night I am hoping to get the kit painted

06-05-2011

Front Air Dam painted and refitted.
I have started on the steelwork of the rear wheel arch, I have cut out a 2" band of inner an outer steel so far I will post pics when I have welded it all back together, I have had a play with spacers today now I have got all my tyres.
I went for 205/50-15 Avon ZV5 which have a nice square side wall.
I have decided that I now need a 25mm spacer on the rear and 20mm spacers on the front. This will sit the wheels in the perfect track position but still need to lower the rear a good 2" or so.

But here is some more pictures for you guys at a local car meet tonight :)

Image
Image
Image
Image
Image
Image

12-05-2011

Well I'm happy as a pig in poo :)

The stickers are on....

Image

And a show plate to hide the registration on track days

Image

And the rear

Image

And a side shot

Image

PJC
Cruising
Posts: 4736
Joined: Mon Sep 06, 2010 7:40 pm

Re: Tonks's 80 2 door quattro RS4 Tourenwagen

Post by PJC » Thu Oct 27, 2011 8:00 pm

Stunning.

Tonks4x4
Neutral
Posts: 35
Joined: Sat Oct 16, 2010 3:40 pm

Re: Tonks's 80 2 door quattro RS4 Tourenwagen

Post by Tonks4x4 » Thu Oct 27, 2011 8:03 pm

13-05-2011

I am dead chuffed everyone likes it here is the real one and mine to compare :)

Image
Image

Image
Image

I pick up my spacers at 8:00 in the morning so that will improve the look

And I have managed to buy some new early style indicators off eBay.de

So I am looking forward to taking it to the show at Ashfield Rugby Club next Sunday :tup:

P.s, everyone is welcome to fetch their classics, the more the merrier.

14-05-2011

Spacers are on thanks to Bambridge :tup sits much better now but will need to cut out some more steel from under the rear wheel arches for more clearance....

Took Rod (Couperman) out for a spin in it today :)

Image
Image
Image

16-05-2011

With the new spacers on and only one lot of steel trimmed inside the arch, the tyres catch quite badly.

So out with the plasma cutter to do some trimming
Image

Once it was all welded back together a liberal coating of black stone guard

Image

Which then left me with the issue of height at the rear....

Coil overs would be the ideal route but for a cheap option for the time being I have cut down a set of S2 springs, I have removed 2 1/2 coils from the springs and have fixed them in position using some heavy duty jubilee clips, overall it has lowered the rear by 4". I now have a clearance of 1" between tyre and the steel arch,

I went out for a spin this evening with SteveT63 for a test run. I was pleasantly surprised that a. It is a very comfy ride. b. It corners like it's on rails and turns in like a go cart. c. There is no rubbing or catching on anything I managed to throw at it tonight.....

Here is a few pics....

Image
Image

17-05-2011

Right then guys here is the bit you have all been waiting for.... :ihih:

I started by blowing off all the dust it has collected over the months :)

Image

I have used tonight as a learning curve as I have never played with one of these engines before.

I wanted to start by removing the wiring and ECU's however once I made a start it becomes apparent you need to remove everything to get at anything :(

Image

I started on the left bank and removed the external cooling pipes, dip stick and manifold, the manifold being a fantastic fixing design and is removable by only removing the top row of nuts.

Next was off with the engine mounting rubber which has some electronic device attached not too sure what it does but resembles some kind of knock/vibration sensor.

Then off with the air con pipes to give me access to remove the water pump which has been damaged in the accident.

That then gave me access to remove the air con pump which is shaft driven from the rear of the engine where the timing chain is.

Image

And then finally off with power steering pump.

Image

None of this stuff will be going back on except the water pump, which leaves this side of the block quite bare.

This then gave me enough access to remove the rest of the engine loom.

Next was the drivers side, again very easy to remove the manifold, but first need to remove the fan belt tensioner before I can get the alternator off.

Image

A really strange thing I have never seen before is that these engines run a water-cooled alternator, I guess they would be a fortune to replace

Image

So that is pretty much as far as I got tonight with interruptions.

You can see just how much tat has been removed

Image

Leaving the dimensions of the actual unit very compact for the power output

Image
Image

I could do with finding out now if there is a need to blank off the power steering and air con outputs on the rear of the engine. I guess they will leak oil otherwise.

Any input from anyone who has had this experience is welcomed :tup:

12-06-2011

Took it out for a ride to the Bolton LeMans meet, had a nice trip up there but on the way home the radiator has sprung a leak!!!!!

But took a few pics at Chatsworth on the way through

Image
Image
Image
Image
Image
Image

Just need it a little lower on the front to match the rear, I'm hoping that when the V8 goes in that will sort it

07-07-2011

A bit of an advance with the cup car tonight :)

Whilst working on the shorty stripping the old dash for grills and vents etc

Image
Image

I could not help noticing that the steelwork on the underside once I removed the heater ducting closely resembled the dash in the bergmeister car.

Image

So.....

After peeling the leather off....

Image

And then an hour of picking the foam off, I was left with exactly what is fitted in the original car.

I just have to blank off the speaker holes :)

I will post a pic tomorrow after a clean and paint.

Booty if you read this sorry I have just seen your wanted add :(

09-07-2011

Sorry for the delay... I had a visit today from Ian aka Bazburn, so decided today to make a start on the dash change. There is still quite a lot of fluff and stickiness to remove off the floor but it's getting there,

Image
Image
Image

Once all the floor is cleaned it can be painted black to match.

Next will be to recreationte the centre vent panel and the main dash panel as the original. I won't blank off the old speaker holes just yet until the cage has been fitted

Again this is the aim picture

Image

11-08-2011

A little update from last night....
i have now managed to source a coupe quattro gearbox from a typ85. The RS4 flywheel has been turned down to fit in the bellhousing. for the time being i have bolted the box to the engine using some 15mm packers. i then piped up the slave to a land rover pedal box to check the clutch disengaged, however the slave is shagged... :(

ordered a new slave from Mr Reeve that should be here in the morning.
i have also managed to order an RS4 spacer ring from a member on the AudiSRS forum. so when that lands i will get bambridge toake me a 15mm version.

then at last the lump can be put in, so that i can start the fabrication job for all the ancils...
here is a pic to keep you entertained.
Image

22-09-2011

Well at last I have some time to spend on my own car....

so here is tonight's little installment!

Old 1.8
Image

Old 1.8 gone...
Image

B7 RS4 4.2 V8 FSi going in...
Image

V8 Sat in...
Image

Image

23-09-2011

Ok so the engine is back out on the floor for some modification to the subframe...

I bolted the gearbox to another subframe using solid mounts to get my correct bell housing position. You can also now see the water jetted 15mm spacer ring on the front of the gearbox.

Image

The engine was then attached to the box and I could then cut out the subframe to clear

Image

Image

Image

Then I spent all evening sand blasting the subframe so that I have fresh steel to weld to

Image

Then before I weld a stiffener plate inside the subframe it was painted and then bolted into the car to stop it from a) going rusty and b) warping like a crisp during welding

Image

During this the gearbox tunnel has been cleaned, repaired, rust treated, primered and painted ready for the gearbox going back in

Image

24-09-2011

Ok so today's task was to put the box back in and bolt the engine to it to see what clearance issues there is going to be.

Image

I have found that the brake servo and master cylinder will fit in the stock location so that is great news for a start. I can reposition the abs unit further down the chassis leg and re use everything. Which means no messing around with twin master cylinders and brake bias bars etc.

I have also found that I can have a custom made thicker core radiator made to fit where the stock 1.8 radiator sits with no issues. There is even some space to fit a slimline Kenlowe fan in there and still have space...

Image

I have however had to cut 2 large sections out of the chassis rails to clear the stock RS4 exhaust manifolds. I have cut the manifolds shorter so I can now extend them down and under the subframe in the correct locations.

Image
Image

The original water cooled alternator fits on it's original mounts and the tensioner and belt also fit without any modification.

The shaft driven air conditioning pump will not be required so that can just have a core plug pushed into the drive hole to stop muck getting in

The power steering pump is also surplus to requirement so can have the same treatment as both this and the aircon are driven off the rear mounted timing chain.

For the power steering I have ordered a Vauxhall Corsa C electric column

So next is for the engine mounts....

I am unsure yet whether to utilise the original rubber mounts and then make brackets to suit or to solid mount the engine as it is a race car and can put up with vibration and noise.... I will chew that over in my dreams tonight :) any comment greatly received on engine mount ideas...

But all in all will look good in there :)

Image

26-09-2011

Well managed to do some more today....

Firstly need some engine mounts so after some head scratching I have opted for some triangulated tubular ones with a land rover polyurethane bush fitted.

Image

Took a little time to get the orientation correct but I am happy how they turned out.

Image
Image
Image

They appear to do the job nicely and not not restrict any room that other components require.

I have also managed to fill the recesses in the chassis rail that have been made to clear the exhausts, they still need some tidying but at least I have lots of clearance now.

Image
Image
Image
Image

Also the Corsa electric steering column has turned up so over the next few days I can get that installed.

Image

29-09-2011

Today's work consisted of clean, prep, rust treat, paint the engine bay

Image
Image

And fit the freshly cleaned, blasted and lacquered steering rack back in

Image

Then a little Sizing up of original column against the Corsa column

Image

I have smashed off the plastic cowling that is for the Corsa so that I am now able to sleeve over the top my original audi switch gear and ignition lock. It is just perched in place here. I am not going to make any structural modifications until my little electric box of tricks arrives from eBay to make it all work.

Image

Engine and gearbox is back in again and all bolted up. Hopefully it won't have to come out again now :)

I still have the exhaust manifolds to alter.

Also the brake servo and master cylinder has been cleaned and painted and re fitted.

I have also managed to relocate the Abs unit further down the engine bay and have run most of the pipes to it in nickel.

Image
Image

I have also made a start tonight at fitting the loom to the engine, hopefully the next evening I get to play the wiring should be all inside the car ready to start to wire in.

I will have to sit down tonight and work out what other bits I need as I can't find much info on these engines and components.

It looks like the RS4 has a variable fuel pump as it appears there is no return from the engine????

I need a maf and it looks like the plug for it has also been hacked off the loom :(

02-10-2011

Had a couple of hours play time today, spent most of the time faffing with brake pipes and trying to bleed the brakes. I am going to need a new front caliper as the nipple is non existent!

Started to get the Corsa column mounted into the correct position.

As I am using a RHD column in a LHD car I have used it what i believe is upside down to how it would be fitted in the Corsa so that I have more room for the electric motor.

I also unbolted the column ECU from the column so that can me mounted elsewhere so again I have more space to get the column tucked up high out the way.

I have chopped out the old mounting from behind the dash and have tacked in a few new brackets to get the position.

Once the column is out again these can be fully welded and a few more reinforcements can be made just in case.

I have also moved the column 30mm towards the driver,this is not essential but suited my driving position better.

Image

Image

My little electric box of tricks landed from eBay so I plugged it in, gave it a 12v live and an earth and it all works :)

Without it attached to the rack I can spin the column with my finger tips and with it set to hard I have to grab it fairly hard to be able to turn it.

More on that when I receive my new Bambridge adjusters and bushes on Tuesday, I should be able to get the steering finished

03-10-2011

Got angry with the car tonight so thrown the towel in!

I ordered a steering wheel boss from eBay which landed and came with the wrong size splines.

So after a dozen phone calls it appears that everyone has no stock of the actual one I need, so a quick call to Megavox in Nottingham to get an original steering wheel and out with the 9 inch grinder to hack it to pieces.

1/2 an hour in the lathe allowed me to turn it down to resemble something like I needed.

Image

This was then screwed back to the crush style wheel boss

Image

Now on to the switchgear. I cut the 3 mounting lugs off the steering lock for where the column switches mount to. And then turned the centre out on the lathe so it would sleeve over the Corsa column.

Image
Image

It was at this point things started to go wrong, firstly the job jumped out the lathe, then it split once sleeving it onto the column then the cheap monkey metal on the top of the Corsa column would not TIG weld!!!

So I managed to get a few tacks to retain it in position and have then gone right round it with chemical metal which has held it spot on.

This allowed me to mount the column switches and the steering wheel now fits and the horn ring and indicator cancel work as they should.

Image

Image

So on to mounting the key barrel.

Offered it all into position of where I want it but then came to plug it in and it fouls the column mounting bracket.

So I have spat my dummy out, swept all the tools in the garage and have gone home.

On a positive side, I have managed to buy some original carbon engine covers for the engine off eBay so they got bolted on.

Image

And I have done a deal with an alloy fab company at Newark-on-Trent to make me a custom radiator that will more than adequately cool the RS4 engine on a track day session. So need to get the old 1.8 one over to them so they have some dimensions to work from.

06-10-2011

Thanks Alex :tup:

Well the dummy has been retrieved and the toys have been placed neatly back in the pram...

I forgot to post last night, but I managed to get some bits done.

The bushes and adjusters for the track rods landed from Bambridge yesterday, so stripped down both track rods, descaled, zinc primed, painted, lacquered, adjusted, bushed and re fitted.

So that is the steering under the bonnet now complete.

While I was doing this the wind was really bad last night and I was in fear of the bonnet taking off and folding back to the screen. So..... Ash suggested that I fit a gas ram to keep it steady for when it is parked up at shows.

After an hour of faffing about it was fitted, but then I was not happy as when the bonnet was up it looked floppy on the other side, so that ended up having another one fitted on the other side :)

Image

It has made the bonnet very heavy to close but it worked out well that when the bonnet is nearly closed the rams have gone over centre and are then forcing it closed so there is less risk of the bonnet popping up.

When I came to roll the car around the garage it is now catching the original front wings on the tyres due to the extra weight of the new engine.

So I marked round the inside of the arches as the maximum I could take out then left a further 10mm to play with later if required.

Image
Image
Image

This was then neatened up, stone chipped and painted black up to the green line. The arches were refitted and there is now plenty of clearance under the arches above the tyre.

Tonight I managed to sort the small shaft from the column to the rack with a UJ. Cleaned up and made gussets for the column mounting brackets, primed and painted all the new steelwork and finally re fitted the steering column for what I hope is the last time.

The column ECU has now been relocated and fits neatly just above the column motor

Image

Then for mounting the RS4 fly by wire gas pedal.

A small steel triangular bracket was made to be welded to the bulkhead and then fixed into a comfortable position

Image

Next was to make the small switch/gauge panel that fits into the centre heater vent location. As I am trying to make the car look fairly authentic inside I have copied the design from the car in Ingolstadt.

I have mounted a push start switch, a volt gauge and the control for my steering assistance on the electric rack. I will also put 2 small toggle switches in there for the front and rear diff lock actuation.

Image

Then to make me smile I have wired up the volt meter and the starter signal wire, so finally the engine has made a noise!!!!! Far from running yet though! :(

Image

I don't know if I had already mentioned it but the gear linkage and clutch is all piped up and functioning too.

More tomorrow night.....

12-10-2011

Little update, glad everyone liked what they saw at ADI, just a shame I failed the challenge this year to have it running on time.

Still awaiting items to land from eBay :(

I did however receive the MAF sensor. Which is a separate component to the tube it mounts into.

I have asked on every forum I am registered on for an RS4 airbox lid so I could cut the tube off.

However no reply so.....

A length of 4" poo pipe, a hole saw and a little 1 1/2" sink soil pipe created the following :)

Image

Image

I have mocked up a loom for the fly by wire pedal and have the proper plastic moulded plug to wire it into thanks to Mike. Just need to order some electric crimps the correct size tomorrow from Vehicle Wiring Products.

13-10-2011

Oh and my sexy radiator landed so that can be fitted once I receive my 60-2 wheel and sensor, I need the space to fit them both before the rad goes in fully

Image

Tonks4x4
Neutral
Posts: 35
Joined: Sat Oct 16, 2010 3:40 pm

Re: Tonks's 80 2 door quattro RS4 Tourenwagen

Post by Tonks4x4 » Thu Oct 27, 2011 8:06 pm

15-10-2011

Managed to have a tinker with diff locks this morning, I wanted to be able to activate both diff locks independently but without having a standard Audi control panel.

So came up with the idea of using two Audi S2 rear diff control units, I have mounted these to the underside of the dash.

Image

These have then piped into the original vacuum lines. I have made a new loom and have now wired two stainless push button switches and two stainless indication lights into the centre panel

Image

Here is with both diffs locked in

Image

I can carry this theme onto the main instrument panel when I do that.

The main rev counter however is proving to be illusive!
It is made by Spiess Motorsport as these are the guys I have since found out that made the tuned engine in the original car.

I have emailed them to see if I can buy one but not holding my breath.

19-10-2011

Well still waiting for parts for crank position sensor!!!! I have sent them lots of email asking where they are but no reply. however I have been following the tracking information and it appears that they are sat in Los Angeles sorting department :wall:

So in the mean time I have been making a few little additions to make it closer to the original vehicle.

Here is a picture of the battery isolator.

Image

Here is a picture of the front air jack

Image

Here is a picture of the rear air jack.

Image

I have installed a pull cord and sticker as per original

Image

I have cut the floor skins but will need to go and buy some steel tube to sleeve over the air jack to retain it in position.

Image

I have then duplicated this in the rear.

Image

Then here is a picture of the original air jack coupling.

Image

And here is a picture of my air lance attached to the nozzle.

Image

20-10-2011

O my god I am so excited I could pee myself!!!!!!

The crank position sensor arrived today. However the crank timing ring did not arrive, so I though just out of interest I wonder if I could hold the sensor by hand roughly in position through the inspection hole in the bell housing AND........

Audi 80 2 Door 4.2 V8 FSi RS4 - YouTube

It only runs for a second or so because, now I am happy that everything is correct I need to get the ECU's decoded

25-10-2011

Some news!!!!

Shark Performance, Mansfield has taken delivery of both my ECU's today for decoding :)

Can't wait to get them back.... Should be next week.

And that brings us up to date!!!!!

Ollieb7
2nd Gear
Posts: 136
Joined: Fri Apr 22, 2011 3:46 pm

Re: Tonks's 80 2 door quattro RS4 Tourenwagen

Post by Ollieb7 » Thu Oct 27, 2011 8:07 pm

Love it! Also love how people restore things that most would'nt give a monkeys about yet when finished that is exactly the thing that makes them so feckin cool. Reeeespect! :-)
Image

PJC
Cruising
Posts: 4736
Joined: Mon Sep 06, 2010 7:40 pm

Re: Tonks's 80 2 door quattro RS4 Tourenwagen

Post by PJC » Thu Oct 27, 2011 8:22 pm

How many stunning's am I aloud ?.

Rick_RS4
Cruising
Posts: 2882
Joined: Mon Dec 13, 2010 4:37 pm

Re: Tonks's 80 2 door quattro RS4 Tourenwagen

Post by Rick_RS4 » Thu Oct 27, 2011 8:45 pm

awesome build

User avatar
ArthurPE
Cruising
Posts: 3755
Joined: Tue Nov 11, 2008 3:15 am
Location: USA

Re: Tonks's 80 2 door quattro RS4 Tourenwagen

Post by ArthurPE » Thu Oct 27, 2011 9:01 pm

gawd dang!
one awesome project, amazing effort, detail & results
Two things are infinite: the universe and human stupidity; and I'm not sure about the the universe...Albert Einstein

User avatar
RSKiwi
5th Gear
Posts: 1109
Joined: Mon Jan 17, 2011 6:43 pm

Re: Tonks's 80 2 door quattro RS4 Tourenwagen

Post by RSKiwi » Thu Oct 27, 2011 9:20 pm

I love this!

:bowdown:
____________________
C5 RS6 Avant

Gone
MRC'd B7 RS4
B6 3.0 A4
C5 A6
Pug 405 NZ Touring Car
Jeep Cherokee (we all have things we are ashamed of)
Toyota Landcruiser
1963 Beige rat look VW Beetle 1.3 no performance engine

User avatar
22B
4th Gear
Posts: 715
Joined: Wed Nov 18, 2009 11:12 pm
Location: NE Scotland

Re: Tonks's 80 2 door quattro RS4 Tourenwagen

Post by 22B » Thu Oct 27, 2011 9:24 pm

Truly an absolutely staggering project from start to finish. Awesome. I love it!
Current;
Porsche 997.1 GT3RS. Pure Orange, ceramics, etc, Sharkwerks exhaust
BMW 2002 restomod; Turbo body kit, S14 M3 Evo engine and lots more
Audi Q3 Black edition Quattro

Previously enjoyed;
Ibis White B7 RS4 Avant : TTS Supercharged 615ps/614 nm
Subaru Impreza 22B
Noble M400
TVR 400SE
Lotus Sunbeam Avon

User avatar
sonny
Cruising
Posts: 10278
Joined: Wed Nov 14, 2007 1:30 am
Location: Kent

Re: Tonks's 80 2 door quattro RS4 Tourenwagen

Post by sonny » Thu Oct 27, 2011 10:01 pm

ahhh ball ox, my post did not post...anyway.

As I previously said, what a fantastic project, I bet that will sound the nuts. What does she weight in at?

Only concern I have, is the front suspension when on track, are you looking at putting coilovers on? As someone who regularly tracks there RS4, these cars can understeer a lot due to engine being up front, being a lightweight V8 (but still heavy in relative terms) might have a adverse effect on your cars handling. However this it just pure guesstimate on my part.

Love the air jacks :beerchug:
Money can't buy you love, but it can buy you a well sorted racecar

User avatar
PeteS4
2nd Gear
Posts: 144
Joined: Wed Jan 22, 2003 6:52 pm
Location: NI

Re: Tonks's 80 2 door quattro RS4 Tourenwagen

Post by PeteS4 » Thu Oct 27, 2011 10:13 pm

That is absolutely amazing. I would love to have the time to do something like that.
B8 S4 Black PreFL Avant
Previous: B7 RS4 Sprint Avant, BMW Z4 3.0 Coupe, TT MK2 3.2, TT MK1 225 Coupe, B5 S4 Avant

User avatar
wellzieRS4
4th Gear
Posts: 587
Joined: Wed Dec 23, 2009 6:51 pm

Re: Tonks's 80 2 door quattro RS4 Tourenwagen

Post by wellzieRS4 » Thu Oct 27, 2011 10:36 pm

<beep> me that should be turned into a book, top read, makes a change from reading all the carbon bullocks arguing bullshit that's on here lately. Really appreciate the body work being a painter myself just wish i had time for a project instead of working on sheds every day

Post Reply

Return to “RS4 (B7 Typ 8E) 2006–2008”

Who is online

Users browsing this forum: No registered users and 119 guests